Create a Personal Website
The Serverless infrastructure behind a static web site. Do you want make it yours? You can start from here.
Why you need a personal website.
Having a personal website is the new portfolio, a new way to introduce yourself, it is a requirement for people to trust you. Relevant content can help you to get your dream job.
Having a personal website gives you leverage to promote your content, share your knowledge. People are continuously looking for solutions to their problems, they search, read, comment, and can share your articles from any part of the world.
Having a personal website gives you a platform to share your idea. If you did a good job anyone can find and know more about you. It requires a bit of work to optimize Search Engine Optimization (SEO) and make your website available on Google, but you will get an enormous satisfaction. You can test your SEO score by using Google Analytics or SEO Tester Online for example but there are many others.
You can comment on this article to say what you think.
Decision focused on two alternatives.
A Personal Website can be created in many different ways, but in most of cases you need a specialized technical knowledge, that's why a content management system, most often referred to as a CMS, is needed to allow individuals and businesses to edit, manage, and maintain existing website pages in a single interface.
Until today WordPress is the most popular CMS, so I started doing some research to figure out best practices to deploy a WordPress infrastructure on AWS, and I have found that something like this is needed:
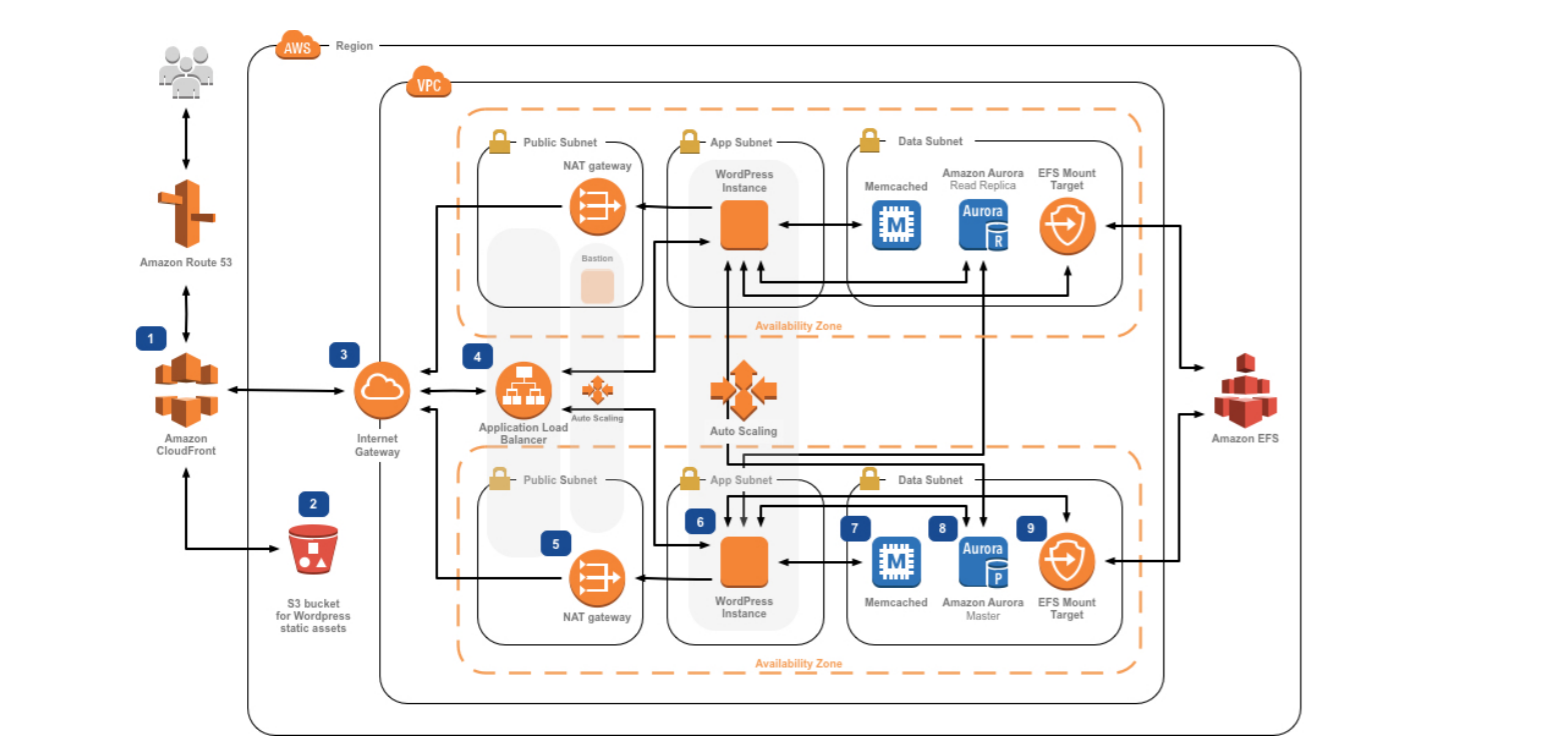
The proposed solution looked to be very expensive, there are bunches of servers here, many of them are useless, at least for my use-case.
That's why I finally decided to use Publii.
Publii is new Static CMS with GUI to build an extremely safe, fast and stylish HTML website.
Publii is a static-website-building tool for every skill level, from beginner to developer.
How Publii works.
Publii does not work in the same way as other CMS, you don't need to buy hosting, upload CMS files and install it directly in the server. What this means is that in traditional CMS everything related to your website is run on the server, you need to install and configure tools and plugins, you must be connected to the internet to create new contents. By using Publii you can styling and creating content for your site offline on your desktop, you don't need to install anything but the Publii client.
Here are your action shortcuts to get a site using Publii:
Part I: Install Publii on your OS.
You can get your Publii installer from the download page. I used Mac OS environment, but Publii is also available for Windows and Linux.
The Publii client is the only thing that you need, no need to install plugins or configure anything else, you can download the installer, install it, and start using the client.
Part II: Create a WebSite using Publii Client.
The first time you run Publii it ask you to create a new website, here you have to provide your website name and the author name that is used to create the author page. You can add more authors later.
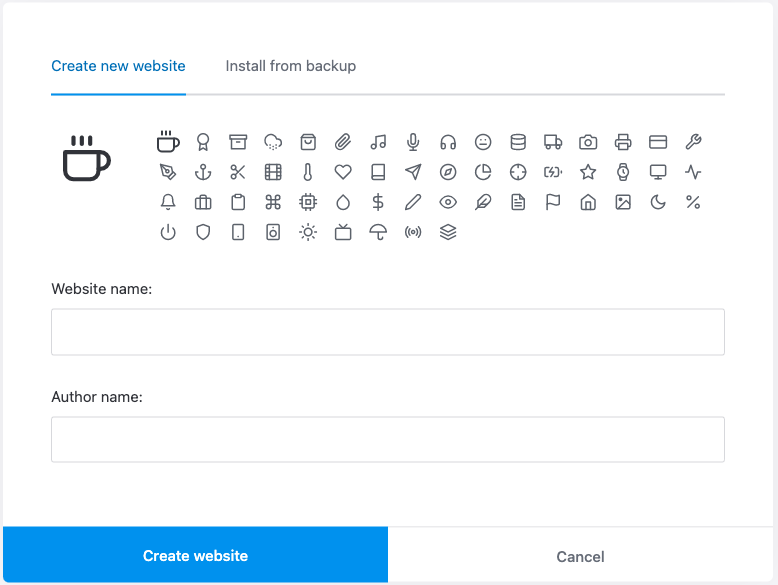
You can create as many sites as you want, click on the current site name on the top left in the Publii Client, it gives you the full list of pages you have and a big "Add new WebSite" button. Click on the button to create a new site or use the list of pages to switch to a different page.
Part III: Select a Theme for your Blog.
You can get your Publii Theme from the marketplace page. There are many templates you can use, more will come in the future, many of them are free to use.
Once you have selected your favorite theme, hit download to get the zip file. To install a new theme navigate to the themes page by clicking on the three dots in the top-right of the Publii client, then clicking the themes option and Install theme as it is shown in the image.
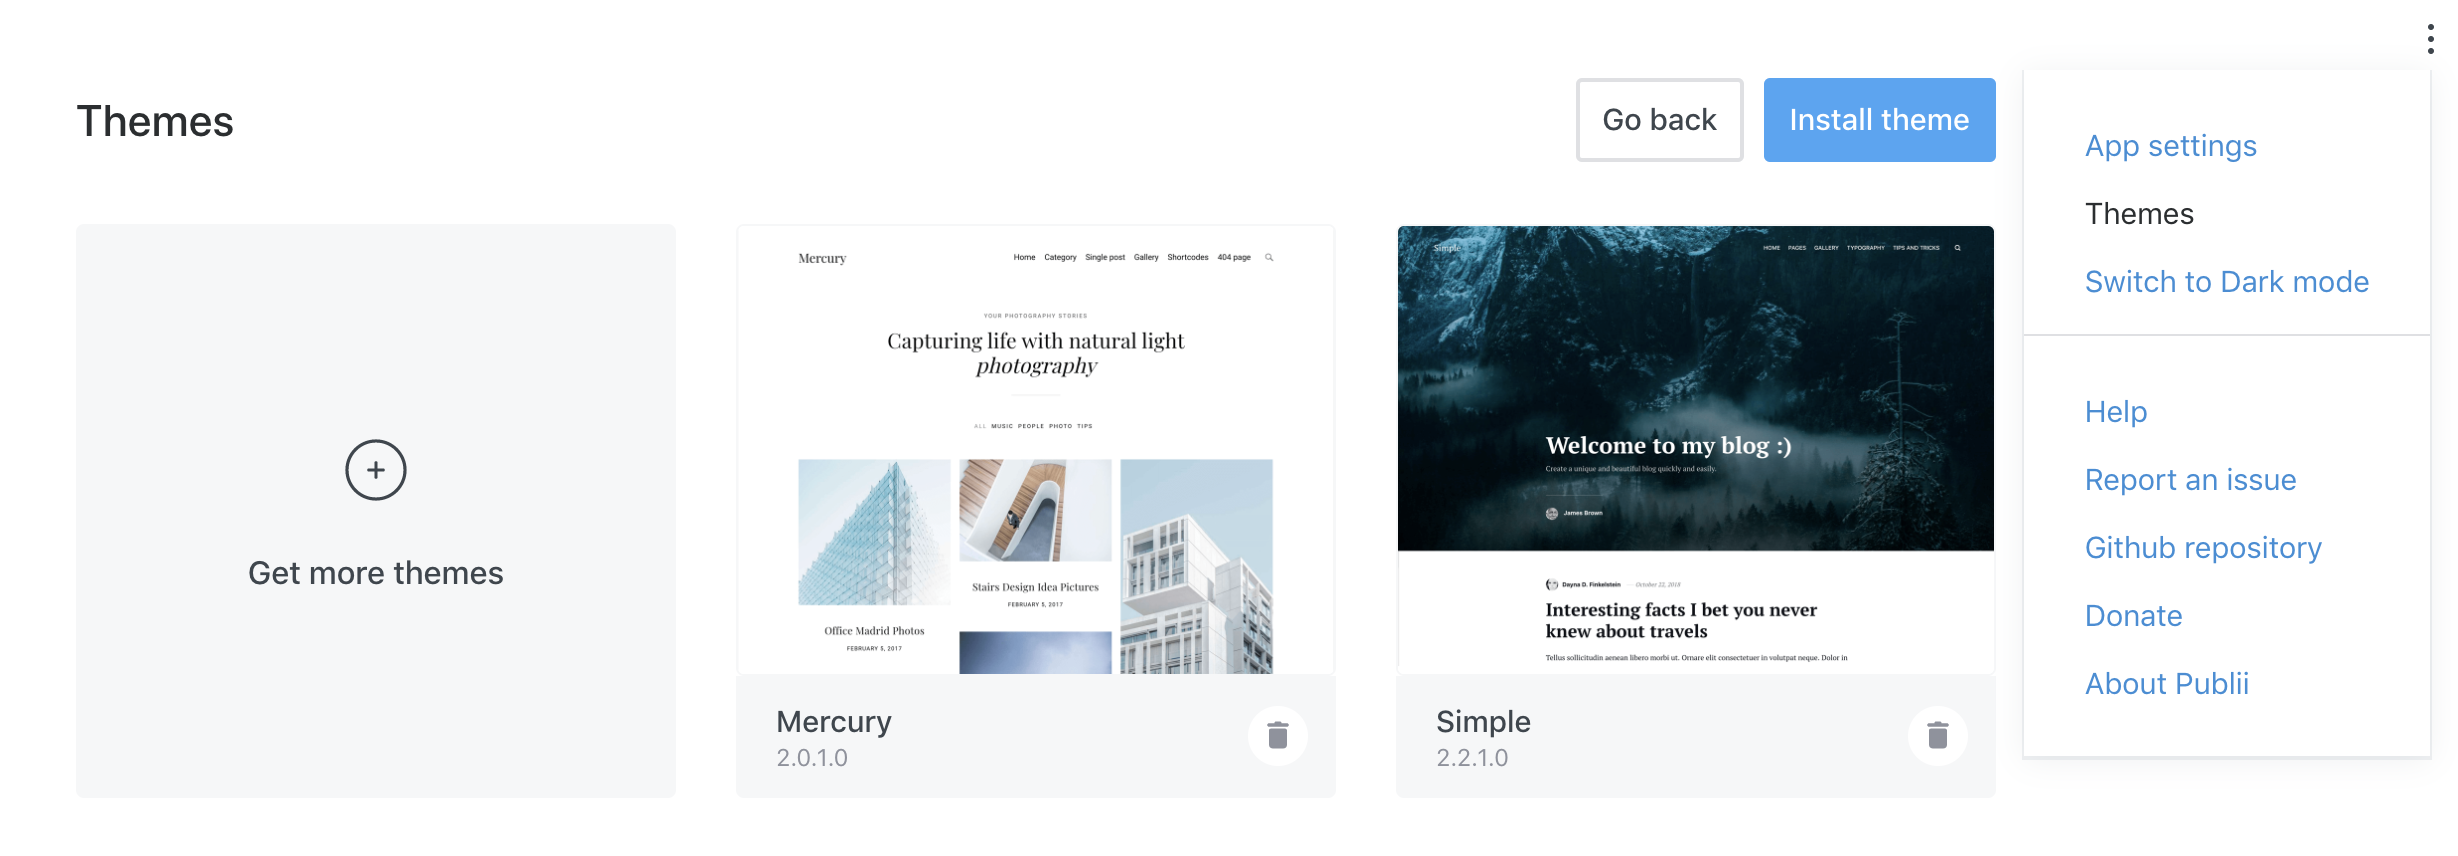
You can click on "Get more themes" to be redirected on the marketplace page.
Part IV: Write your first Blog Post.
To begin creating a post you can click on the posts option in the left-sidebar to be taken to the posts screen. The first time you do this you'll be presented with a choice of three different already build-in editors that you can use to create your first post; a Block Editor, a Markdown Editor, and a WYSIWYG Editor.

Every time you create a new post you can choose which editor to use, each one has its advantages and disadvantages. For example, I use Block Editor to share slides about a speech, Markdown Editor to create a README description of a project, and WYSIWYG Editor to create a discursive post like this one.
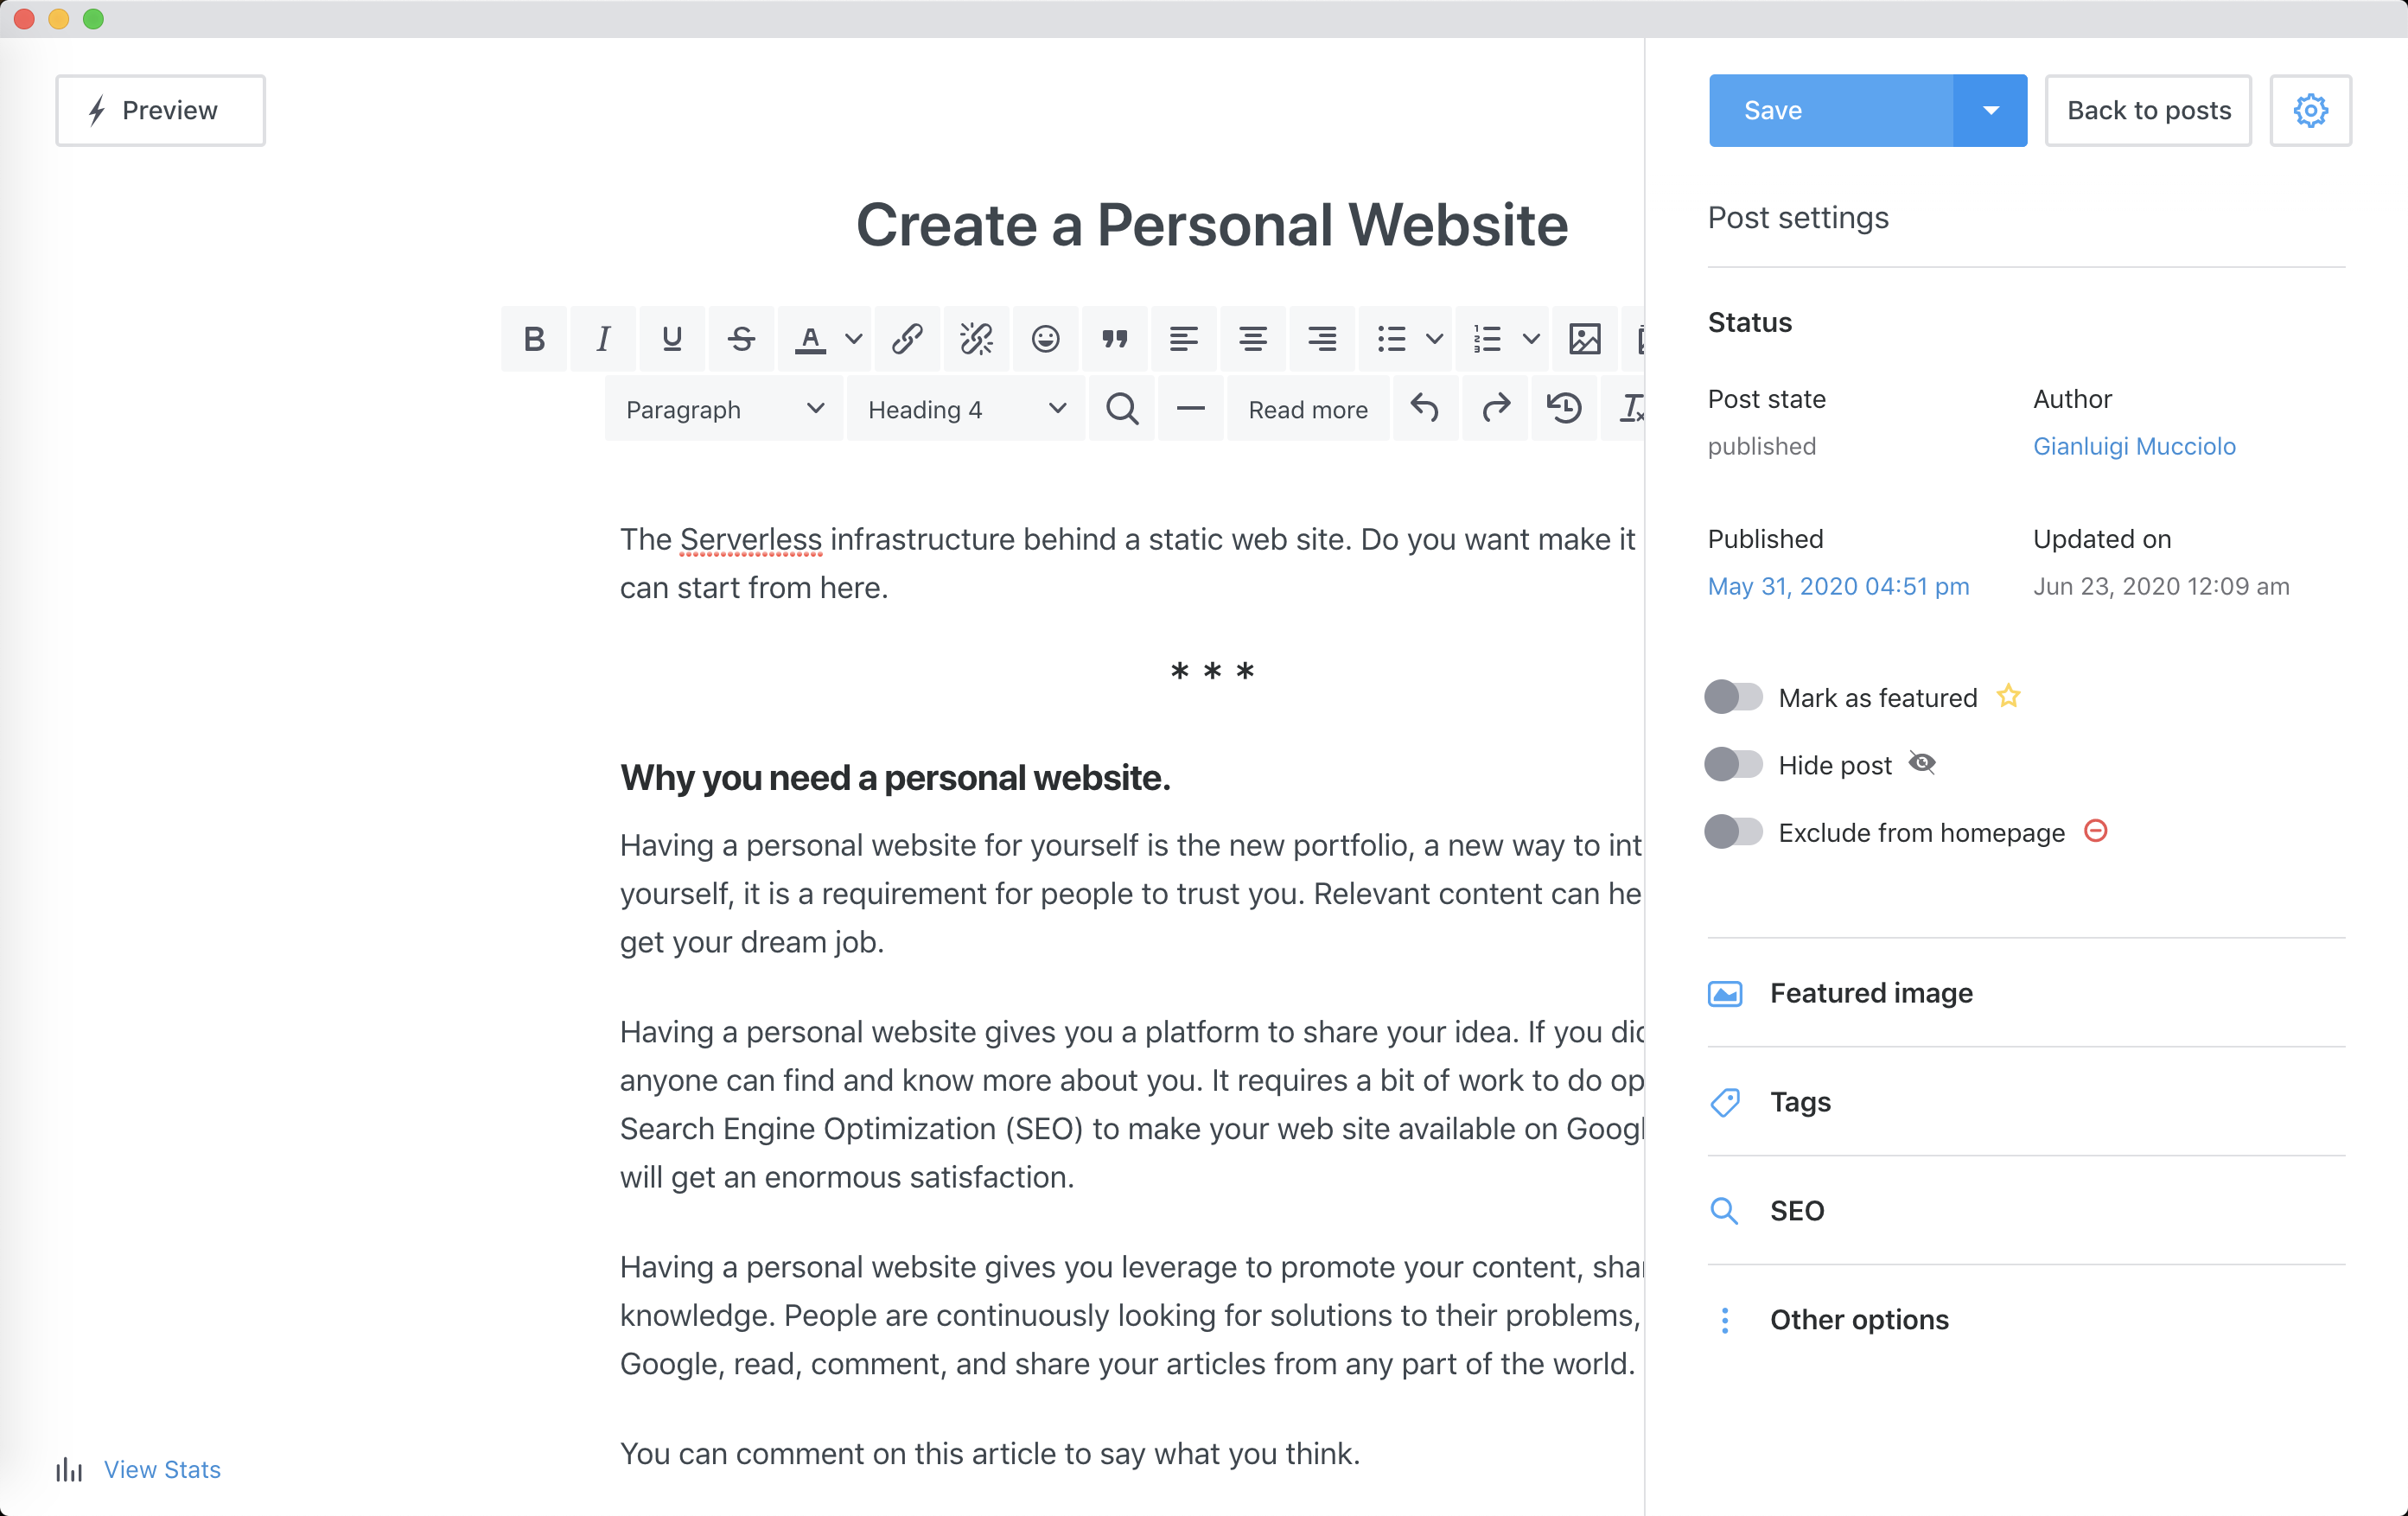
Each post has its configuration. You can select the Featured image, add tags, update the SEO configuration, together with other options like having or not the comments section.
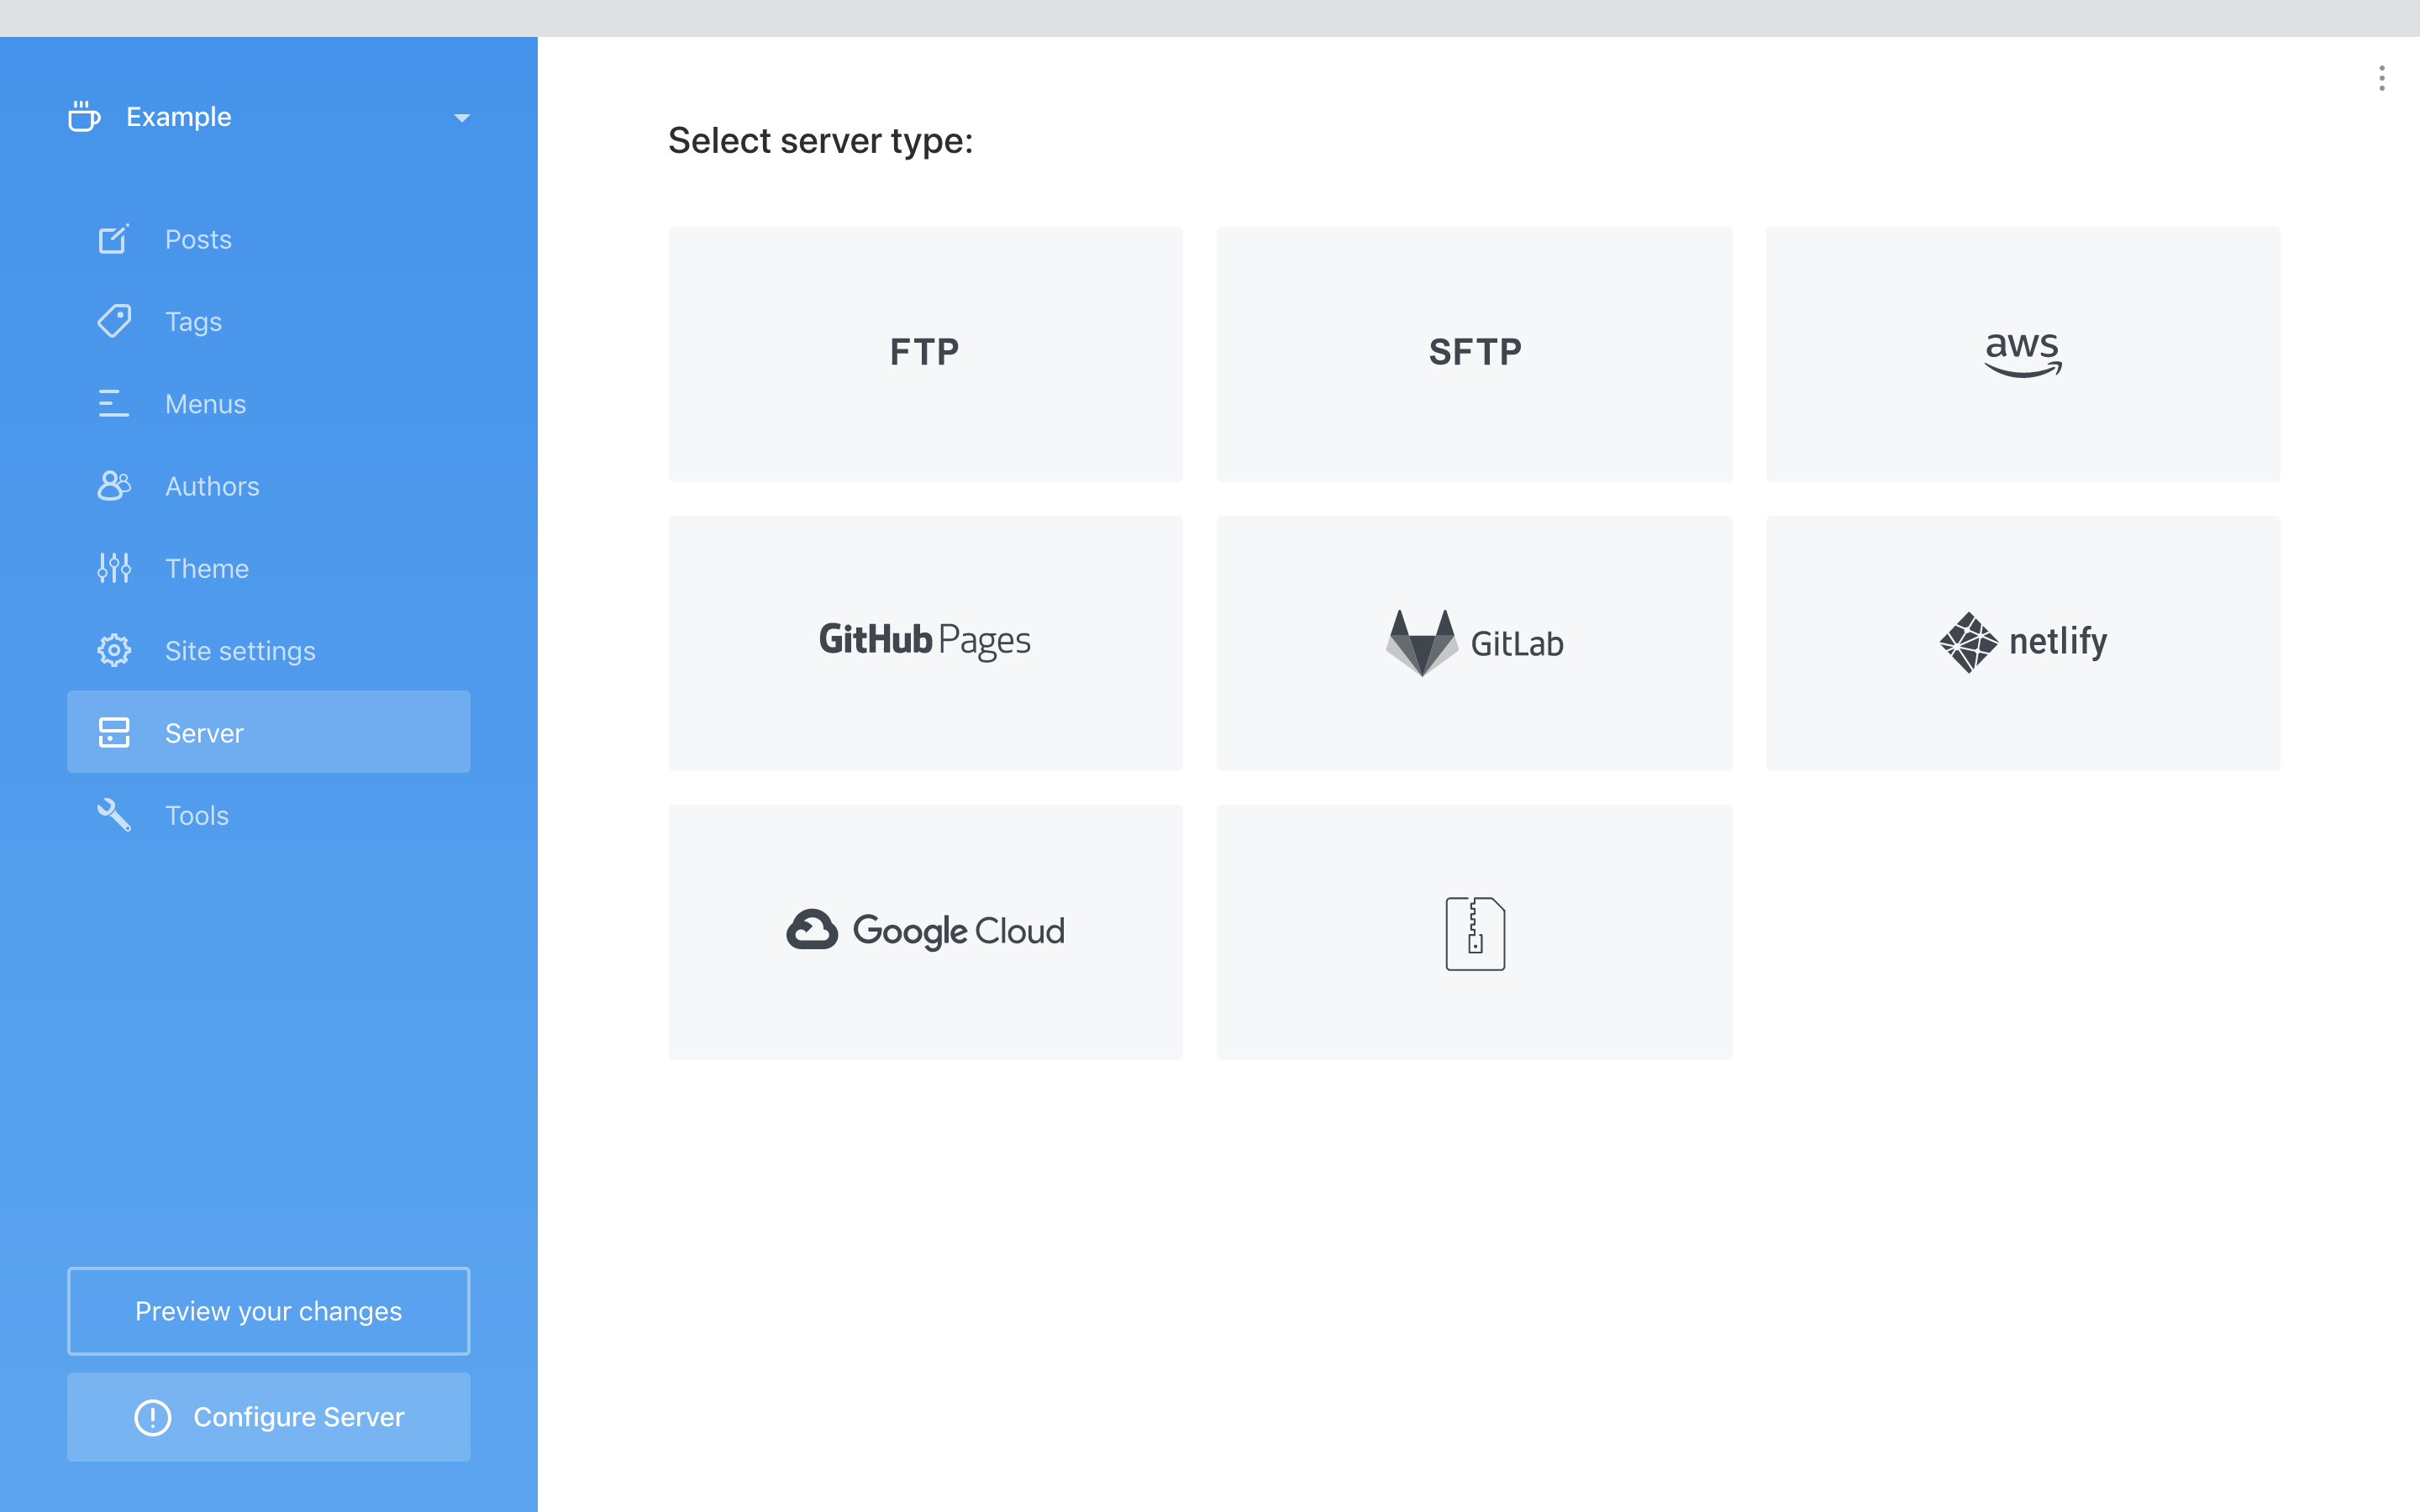
Part V: Publish your Blog.
When you are ready to go live you have to select the remote server, and perform deploy on it.
Publii includes support for traditional FTP and SFTP server, as well as for multiple Cloud-Hosting Solutions, there is also an option for Manual Deployment, which exports the website files to your local machine.
The remote server configuration is related on your selected option, I used Amazon S3 on Amazon Web Services.
When you are ready to go live you'll just need to hit the "Sync Your Website" button in the bottom-left of the Publii app. After that you have basically done.
Part VI: (Optional) Make your configuration portable.
If you plan to work at the same website from different workstation you can synchronize your configuration with Dropbox. Here you can found the official documentation that instructs you on how to do this.
After installation Publii will store its files into a location on your computer, which will differ depending on whether you are using Windows, Linux or MacOS:
- Windows stores the configuration in
C:\Users\USER NAME\Documents\Publii - MacOS stores the configuration in
/Applications/Publii - Linux stores the configuration in
/opt/Publii/resources/app/
So, regardless of what method you are using to share your configuration, the only thing you need to do is:
- upload somewhere the Publii configuration;
- sync your data with the target workstation:
- create a page that has the same name as the one you are trying to import.
How the infrastructure of this web site looks like.
This website has a full Serverless infrastructure. Serverless allows you to build and run applications and services without thinking about servers. This lets you focus on your application code instead of worrying about provisioning, configuring, and managing servers. You only need to configure services together and upload your application code. There is no software or runtime to install, maintain, or administer.
Below are the reasons and requirements for the proposed solution:
- Do not manage servers and installations, do not pay for unused resources;
- Versioning, Continuous Integration and Delivery of the code;
- Make available personal Resume both in PDF and HTML format;
- Avoid using CSS, HTML and any related specialized technical knowledge;
- Have an extensible solution.
A diagram of the proposed solution is presented below:

There Environments
There are three environments: development, stage, and production.
Development environment is on my computer. Here is where I do all of my code updates and perform preliminary testing. I release the code when it works locally.
Stage environment is very similar to the production environment, in this case all of the code is on the Amazon S3 bucket instead of my local machine. All of the hard core testing happens here. The stage environment help me find and fix any issues that come up.
Production is for live code, is where users can access the final code after all of the updates and testing. Of all the environments, this is the most important one.
CI/CD Pipeline
The CI/CD pipeline helps me automate steps in my software delivery process, such as initiating code builds, running automated tests, and deploying to a stage or production environment.
In this case I use Code Pipeline and Code Build in order to automate the process of Personal Resume generation. Personal Resume is automatically generated from YAML configuration file in both HTML and PDF format. The pipeline generates the final result from a Jekyll Template.
Public Domain
Amazon Route 53 is a highly available and scalable cloud Domain Name System (DNS) web service. I got the domain name directly from Amazon Route 53, but you can also transfer the registration for existing domains from other registrars to Route 53.
Remote Server Configuration
Publii let you to use Amazon S3 as remote server to host your static website, please read the official documentation for the step by step configuration.
Amazon S3 is object-level storage that allows you to store as much data as you want. When an object being uploaded to or deleted from a specific bucket an event notifications is send. I used those notifications to trigger an AWS Lambda scripts that translates the whole website by using Amazon Translate. Publii does not have multi-language support for post content.
Publii
Publii is used for content generation. Publii Client is installed on my local machine and it already has everything is needed to develop the website, you don't need to install anything else.
Publii integrates Disqus for comments to posts, and google search for the content search component.
The configuration of Publii is synchronized with Github, git allows me to version the code and to work from different workstations.
CloudFront
Amazon CloudFront is a content delivery network (CDN), placed in front of Amazon S3 to deliver the assets and to improve the website performance.
You can create a distribution by using Amazon S3 as origin, in this case, the traffic generated between the service and CloudFront does not introduce any additional fee, and it enables secure connection over https, http to https redirect, gzip content compression and so on.
This is the most expensive component. I used Class 100 as pricing class, it uses only edges location placed in USA and Europe to serve the contents instead of whole global edge locations. This configurable option lets you reduce your delivery prices by excluding more expensive edge locations.
How WebSite looks like using Infrastructure as Code
As you may already know I love to Automate things. Below you can find the whole infrastructure as code you can use to replicate the whole website.
Here you can find the CloudFormation template related to the Publii infrastructure, it creates Amazon S3 Buckets, AWS Lambda functions, and Amazon CloudFront distribution, and the Record Sets in Amazon Route 53. I have created a Makefile that you can use for deploy. Before doing make deploy ENV=stage or make deploy ENV=production you have to update parameters file in envs folder. You must already have your domain name, an HTTPS Certificate in Nord Virginia Region, and an Amazon Translate Custom Terminology.
Personal Resume is created using a Jekyll Template, you can find it in the GitHub Repository. I have created a Makefile that you can use for deploy. Before doing make pipeline you have to update BucketNames parameters, you can use those that are created during Publii infrastructure creation, and Sites parameters in the cloudformation.json file.
How much it cost

In the proposed infrastructure these are the main cost items:
- CI/CD Pipeline, consisting of Code Pipeline and Code Build, cost about 1$/month only if the pipeline is executed, otherwise the cost is zero if the pipeline is never executed in a month.
- Amazon S3 storage has a monthly cost of $0.023 per GB, practically zero since it is a static site.
- WebSite requests have a monthly cost of $0.0004 per 1000 requests, zero if no one visits the site. This value reduced a lot because of the caching of the CloudFront distribution.
- The Amazon Translate's API has free tier plan of 2 million characters per month, otherwise it cost about $15 for a million characters.
- Amazon Route 53 Registrar cost is about $15/year.
- CloudFront cost is related to the amount of traffic that is generated by user interactions and by the number of requests. Traffic has a monthly of $0.085 per GB, while requests have a monthly cost of 0,0120$ per 10000 requests, the price is zero if no one visits the site.
The total cost of the solution is less than $4 per month.
Comments