Certified Kubernetes (Part 1)
This blog post will provide an introduction to Kubernetes, what it is, and how you can use it, and build an understand the fundamentals.
These are my personal notes I made while I was studying CKA and CKAD certifications.
I passed the CKAD with 78/100 exam score, and I passed the CKA with 85/100 exam score. The minimum score to pass the certification is 66 over 100.
Overview
Here's what we'll discuss in this post. You can click on any top-level heading to jump directly to that section.
Table of Contents
The Kubernetes Architecture
In this section there are some basic concepts and terms related to Kubernetes (K8s) architecture. The purpose is to provide the knowledge about the main components.
Cluster: A Kubernetes cluster consists of one or more nodes managed by Kubernetes. If our a node fails, your app will be down. So a cluster is a set of nodes grouped together. Even if one node fails, your application will still be accessible from the other nodes. In addition, having multiple nodes helps in sharing the computational load as well.
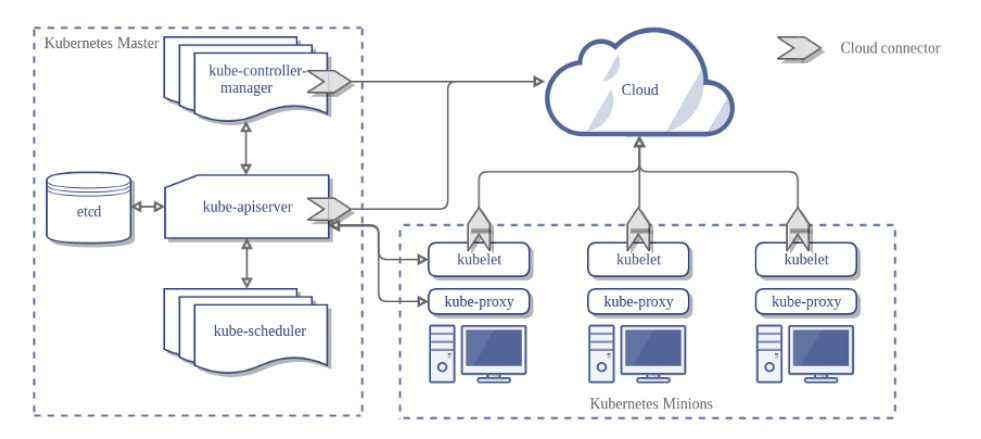
Master Node: It is s responsible for managing the cluster. For example it store the information about the members of the cluster, if a node node fails it is responsible to move the workload of the failed node to another worker node. In addition, it monitor the nodes into the cluster.
The master nodes runs the Kubernetes control plane. The control plane consists of different processes, such as an API server, scheduler, controller manager and etcd.
- Kube-APIServer: This component exposes the Kubernetes API, it is the front-end for the control plane. The users, management devices, and command line interfaces all talk to the API server to interact with the Kubernetes cluster.
- Kube-Scheduler: It is a component on the master node that watches newly created pods that have no node assigned and selects a node for them to run on.
- ETCD: is a distributed reliable key-value store used by Kubernetes to store all data used to manage the cluster. It stores the configuration information which can be used by each of the nodes in the cluster, and other information about resources like pods, deployments, etc. It is usually installed on the master, but it can also be deployed on multiple nodes. It stores the data of the database at /var/lib/etcd.
- Kube-Controller-manager: It has many logically separate functions, but to reduce complexity all runs in a single process. Those functions are the Node Controller that is responsible for noticing and responding when nodes go down, the Replication Controller that is responsible for maintaining the correct number of pods for every replication controller object in the system and the Endpoints Controller that is responsible to populate the Endpoints of Services and Pods.
- Cloud-Controller-Manager: When it comes to the cloud there is another component that interact with the underlying cloud providers. It has many other functions like the Service Controller that is responsible for creating, updating, and deleting cloud provider load balancers, the Volume Controller that is responsible of creating, attaching, and mounting volumes and Service Account and Token Controllers that is responsible for create default accounts and API access tokens for new namespaces.
Nodes (Minions): In a Kubernetes cluster each machine has a dedicated role, can be master or worker. The master is our API point, the workers are in charge of running the app. The machines that acts as workers, used to be called nodes or minions.
The worker nodes runs different processes, such as kubelet, kube-proxy and docker.
- Docker: helps in running the encapsulated application containers in a relatively isolated but lightweight operating environment.
- Container Runtime: is the software that is responsible for running containers. Kubernetes supports several runtimes: Docker, containerd, cri-o, rktlet, and any implementation of the Kubernetes CRI (Container Runtime Interface).
- Kubelet: is the agent that runs on each node in the cluster. Usually, it communicates with the master component to receive commands and work, interacts with the ETCD store to read configuration details and write values. The Kubelet process then assumes responsibility for making sure that the containers are running on the nodes as expected. It manages network rules, port forwarding, etc. Kubelet can also deploy Static PODs independently, the agent constantly monitors the /etc/kubernetes/manifest path and deploy everything inside. The Kubelet doesn’t manage containers that were not created by Kubernetes.
- Kubernetes Proxy Service: is a proxy service that runs on each node and helps to make the service available to external hosts. It helps to forward requests to the correct container and is able to perform raw load balancing.
Client: Kubernetes follows a client-server architecture where the client use a command line tool to interact with the cluster.
- Kubectl: command is a line tool that interacts with kube-apiserver and send commands to the master node. Each command is converted into an API call. If the API Interface fails also the line tool stops working, in this case you have to ssh into the cluster and use docker commands to troubleshoot the problem.
Kubernetes uses client certificates, bearer tokens, or an authenticating proxy to authenticate API requests, you can check the location and credentials that kubectl knows about with this command: kubectl config view. The default location of .kube/config file in linux is ~/.kube/config.

Basic Notions
PODs: From K8s docs, pods are the smallest deployable units of computing that you can create and manage in Kubernetes. If you need to run a single container in Kubernetes, then you need to create a Pod for that container.
- A Pod can contain more than one container, usually these containers are relatively tightly coupled. A container can be a Docker container, rkt container, or a virtual machine (VM).
- Containers in a Pod run on a “logical host”; they use the same network namespace, and use shared volumes. It makes possible for these containers to efficiently communicate. Ci sono tre principali pattern nel Multi-Container PODs e sono: Sidecar, Adapter e Ambassador.
- Scaling operation creates new PODs, it replicates all containers in the POD.
- You can attach a Label to a Pod. Labels can be used to organize and to select subsets of objects.
- Each Pod is assigned a unique IP address. Inside a Pod the containers that belong to the Pod can communicate with one another using localhost.
- PODs can communicate each other via IP address only if in the same node. To connect PODs in a Cluster, you need a network manager such as Calico.
apiVersion: v1
kind: Pod
metadata:
  name: hello
spec:
  containers:
   - name: hello
     image: busybox
     command:
     - '/bin/sh'
     args:
     - '-c'
     - 'while true; do echo hello; sleep 10; done'
     env:
     - name: APP_COLOR
       value: pink
     - name: APP_BACKGROUND
       valueFrom:
        configMapKeyRef: ConfigMapName
     - name: API_KEY
       valueFrom:
        secretKeyRef: SecretName
- You can specify the environment variables by using the env property. In the above example, the value is taken from different sources.
- When te container starts it execute the actions that are specified under the command and args sections. In the case of the example the container executes /bin/sh -c "while true; do echo hello; sleep 10; done".
- The command section in Kubernetes is the same as ENTRYPOINT in docker, while the args section in Kubernetes is the same as COMMAND in docker.
To create a POD you can use the below command:
$ kubectl run nginx --image=nginx --dry-run=client -o yaml > pod.yaml
By using a --dry-run=client option you can generate a sample YAML file, just customize it and create the POD with kubectl apply -f pod.yaml command.
ReplicaSets: From K8s docs, a ReplicaSet ensures that a specified number of pod replicas are running at any given time, deployment instead is a higher-level concept that manages ReplicaSets.
- It is an holder for PODs, for each POD in the holder it monitors the execution status, with a ReplicaSets you can control how many PODs are in the holder.
- In order to manage failures you have to provide PODs YAML definition.
- It does not give you a strategy to replace PODs in the holder, check Deployment for this.
Deployment: From K8s docs, a Deployment provides declarative updates for Pods and ReplicaSets along with a lot of other useful features. You have to use Deployments instead of ReplicaSets, unless you require custom update orchestration or don't require updates at all. This actually means that you may never need to manipulate ReplicaSet objects.
- When you create a Deployment also a ReplicaSets is automatically created.
- You can use strategy section in order to specify the release mode, it can be Rolling Update or Big Bang (Recreate in k8s).
- The RollingUpdate strategy has some additional settings with which you can specify how many PODs at most can be down at a time during the deployment.
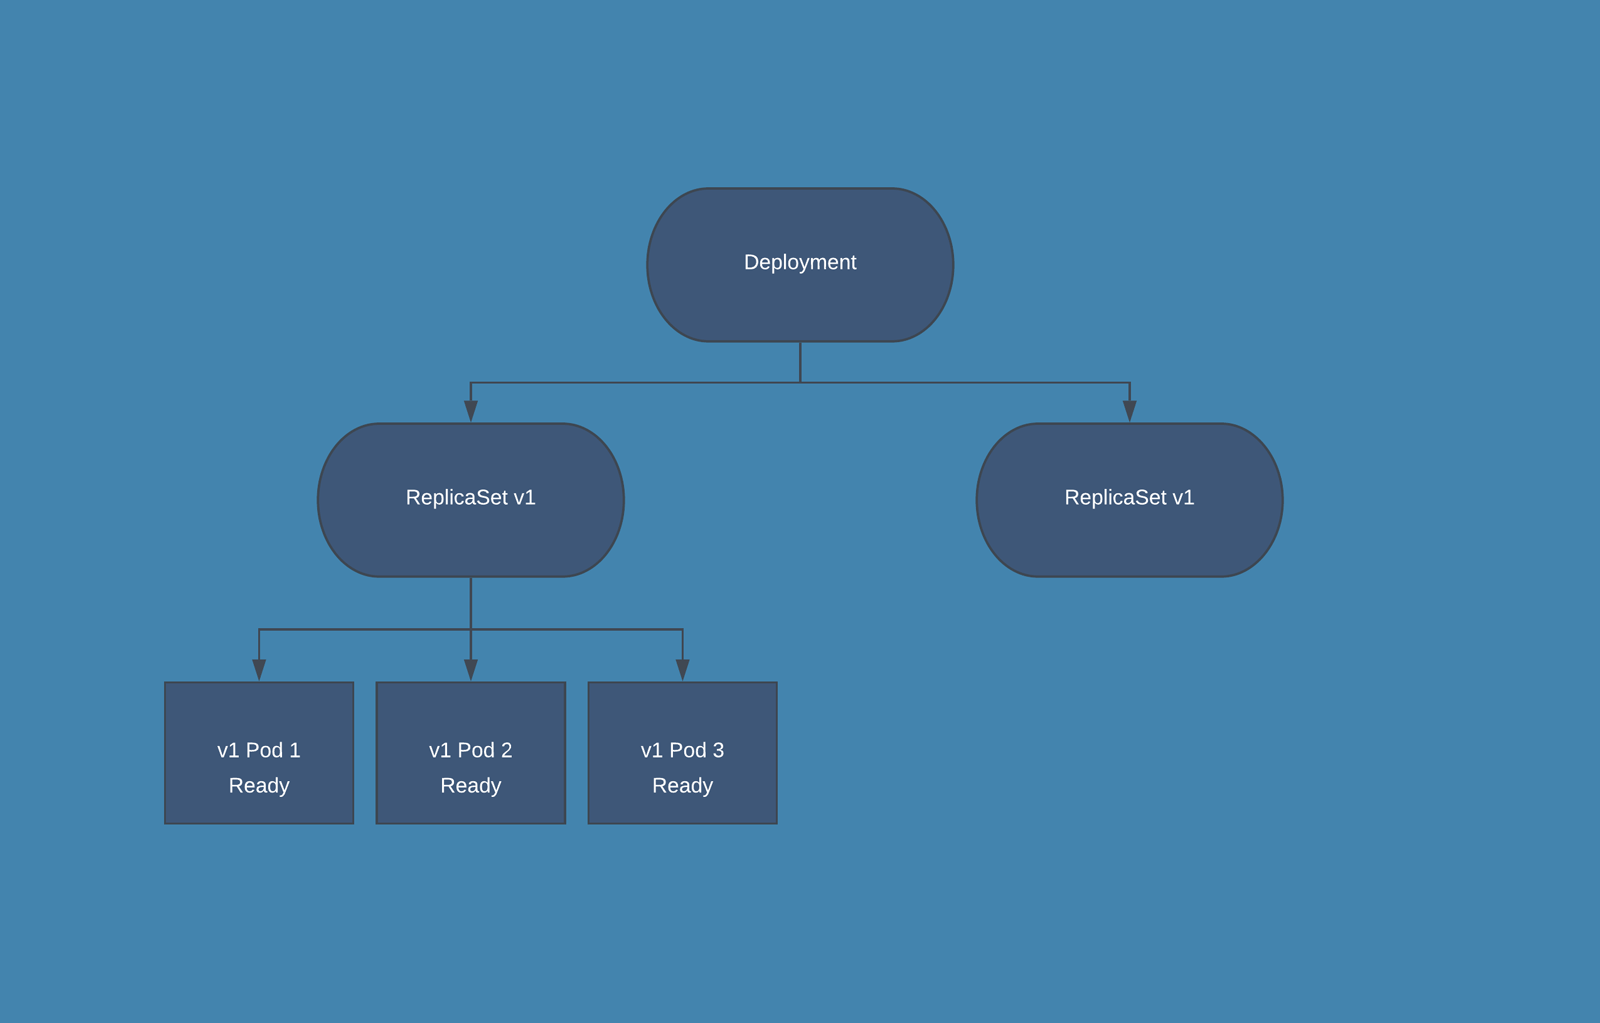
- During the release phase the Deployment creates a new ReplicaSet in which new PODs are created, according to the release settings the old PODs are deleted from the first ReplicaSet and new PODs are started in the second one.
apiVersion: apps/v1
kind: Deployment
metadata:
  name: nginx-deployment
  labels:
    app: nginx
spec:
  strategy:
   rollingUpdate:
    maxSurge: 25%
    maxUnavailable: 25%
   type: RollingUpdate
  replicas: 3
  selector:
    matchLabels:
      app: nginx
  template:
    # This is the pod template
    metadata:
      labels:
        app: nginx
    spec:
      containers:
      - name: nginx
        image: nginx:1.14.2
        ports:
        - containerPort: 80
# The pod template ends here/pre>- In the above example to switch from RollingUpdate to Recreate you have to delete the rollingUpdate section, and set the property strategy.type:Recreate. In this case, Kubernetes deletes in a single step old PODs from the first ReplicaSet and creates new PODs in the second one.
- The YAML of the Deployment resource also contains the definition of the pod used by the underlying ReplicaSet to start new resources. To identify which resource belongs to a Deployment - and therefore to the underlying ReplicaSet - Kubernetes uses labels. The selector.matchLabels section selects all the POD with the label app=nginix.
- To be selected by a Deployment, the POD must specify the same label app=nginix into the metadata.labels section.
To create a Deployment you can use the below commands:
$ kubectl create deployment --image=nginx nginx --dry-run -o yaml > deployment.yaml
By using a --dry-run=client option you can generate a sample YAML file, just customize it and create the Deployment with kubectl apply -f deployment.yaml command. If you update the definition, the deployment creates new PODs by following the release strategy. You can perform rollback operation by using this command:
$ kubectl rollout undo deployment/myapp-deployment
Namespaces: From K8s docs, Namespaces are a way to divide cluster resources between multiple users, teams or projects. It provide a scope for names and resources in namespace need to be unique, but not across namespaces. You cannot create a nested namespace and each resource can only be in one of it.
- Some namespaces are created automatically by Kubernetes.
- Default, unless otherwise specified everything is created within this namespace.
- kube-system contains what is needed to run k8s, while kube-public here is where the resources that are to be made available to all users should be created.
- Resources in a Namespace can reach others using the name.
- For resources in a different Namespace you need to add the namespace name and svc.cluster.local. For example, db-service.dev.svc.cluster.local consists of <service-name>.<namespace>.svc.cluster.local where svc stands for Service and cluster.local is the ClusterDomain.
- ResourceQuota can be used to limit the resources that can be used for resources in a namespace.
To create a Namespace you can use the below commands:
$ kubectl create namespace test --dry-run=client -o yaml

# namespace.yaml
apiVersion: apps/v1
kind: Namespace
metadata:
  name: test
  creationTimestamp: null
spec: {}
status: {}

$ kubectl apply -f namespace.yaml
DaemonSets: From K8s docs, a DaemonSet ensures that all (or some) Nodes run a copy of a Pod. As nodes are added to the cluster, Pods are added to them. As nodes are removed from the cluster, those Pods are garbage collected. Deleting a DaemonSet will clean up the Pods it created.
- DaemonSets are used to ensure that some or all of your K8S nodes run a copy of a pod, which allows you to run a daemon on every node.
- When you add a new node to the cluster, a pod gets added to match the nodes.
- When you remove a node from your cluster, the pod is put into the trash.
- Deleting a DaemonSet cleans up the pods that it previously created.
- DaemonSets are useful for deploying different types of agents.
- The typical use case for a DaemonSet is logging and monitoring for the hosts.
Jobs: From K8s docs, Jobs are a way to ensure that one or more pods execute their commands and exit successfully. When all the pods have exited without errors, the Job gets completed. When the Job gets deleted, any created pods get deleted as well.
- There are many scenarios when you don’t want the process to keep running indefinitely.
- You can use jobs to perform batch operations.
- The Default behavior for PODs does not make them useful to implement this, because k8s would recreate them each time to ensure that the required number of PODs are running. You can get around this by properly configuring restartPolicy:Never however it would still be a workaround.
- You can use Jobs to handle the case where you need to parallelize data transformation. In this case, the Job makes ensures that each task has correctly completed the operation.
To create a Job you can use the below commands:
$ kubectl create job job-test --image=busybox --dry-run=client -o yaml

# job.yaml
apiVersion: batch/v1
kind: Job
metadata:
  name: job-test
  creationTimestamp: null
spec:
  spec:
    parallelism: 2
    completions: 6
    template:
      # This is the pod template
      metadata:
        name: job-terst
        creationTimestamp: null
      spec:
        containers:
        - image: busybox
          name: batch
          resources: {}
          command: ["echo","job-test"]
        restartPolicy: OnFailure
      # The pod template ends here
status: {}
By using a --dry-run=client option you can generate a sample YAML file, just customize it and create the Job with kubectl apply -f job.yaml command. The above example executes six jobs with a parallelism of two.
Cron Jobs: From K8s docs, Cron Jobs are useful for periodic and recurring tasks, like running backups, sending emails, or scheduling individual tasks for a specific time, such as when your cluster is likely to be idle.
- You can use CronJobs for cluster tasks that need to be executed on a predefined schedule.
- For example log rotation command should not be running continuously. It gets scheduled, and once the task is executed, it returns the appropriate exit status that reports whether the result is a success or failure.
StatefulSets: From K8s docs, StatefulSets are a higher-level abstraction over Pods in Kubernetes, designed to manage stateful applications and workloads. Unlike Deployments, which are designed for stateless applications, StatefulSets provide features that make it easier to manage stateful applications like databases or distributed data processing systems.
- Each Pod created by a StatefulSet has a unique and stable hostname, like web-0, web-1, and so on, where "web" is the name of the StatefulSet, and the number is an index that increases sequentially.
- StatefulSets can be used with Persistent Volumes and Persistent Volume Claims to provide each Pod with its own dedicated and stable storage. This ensures that the data persists even if the Pod is rescheduled or restarted.
- StatefulSets ensure that Pods are created, updated, and deleted in a sequential and predictable order, respecting the desired state of the application. For example, when scaling up, Pods are created one-by-one in increasing order, and when scaling down, Pods are deleted in decreasing order.
These features are important for stateful applications that require persistent storage to maintain their state, and this behaviour also ensures that the application remains in a consistent state during the deployment process.
$kubectl create statefulset nginx-statefulset --image=nginx:latest --replicas=3 --port=80 --dry-run=client -o yaml

apiVersion: apps/v1
kind: StatefulSet
metadata:
  name: nginx-statefulset
spec:
  serviceName: nginx
  replicas: 3
  selector:
    matchLabels:
      app: nginx
  template:
    metadata:
      labels:
        app: nginx
    spec:
      containers:
      - name: nginx
        image: nginx:latest
        ports:
        - containerPort: 80
        volumeMounts:
        - name: nginx-pvc
          mountPath: /usr/share/nginx/html
  volumeClaimTemplates:
  - metadata:
      name: nginx-pvc
    spec:
      accessModes: [ "ReadWriteOnce" ]
      resources:
        requests:
          storage: 1Gi
In this example, the StatefulSet creates three replicas of an nginx application using the nginx:latest Docker image. Each replica is given a unique and stable hostname based on the StatefulSet's name (nginx-statefulset) and an index that increases sequentially (nginx-0, nginx-1, and nginx-2). The StatefulSet also creates a Persistent Volume Claim template that ensures each Pod gets its own dedicated and stable storage of 1Gi. The volumeMounts property.
Init Container: From K8s docs, an init container is the one that starts and executes before other containers in the same Pod. It’s meant to perform initialization logic for the main application hosted on the Pod.
- An Init Container is defined in the same way as a container for a Pod, but in the initContainers section.
- Init containers are started and executed at POD startup and before the main containers, so it is a good candidate for delaying the application initialization until one or more dependencies are available.
- You can have multiple Init containers in same POD, they are started and executed in sequence. An init container is not invoked unless its predecessor is completed successfully.
- You can use Init containers to create the necessary user accounts, perform database migrations, create database schemas and so on.
- If any of the init containers fail, the whole Pod is restarted, unless you set restartPolicy to Never.
- Restarting the Pod means re-executing all the containers again including any init containers. You may need to ensure that the startup logic tolerates being executed multiple times.
- All containers on the same Pod share the same Volumes and network. You can make use of this feature to share data between the application and its init containers. You can use Init Container to download a configuration and make it available to other containers.
apiVersion: v1
kind: Pod
metadata:
  name: database
spec:
  initContainers:
    - name: fetch
      image: busybox/wget
      command:
       - '/bin/sh'
      args:
       - '-c'
       - 'wget site.url/dmp.sql -o /docker-entrypoint-initdb.c/dump.sql'
      volumeMounts:
        - mountPath: /docker-entrypoint-initdb.c
          name: dump
   containers:
    - name: mysql
      image: mysql
      env:
       - name: MYSQL_ROOT_PASSWORD
         value: "admin"
      volumeMounts:
        - mountPath: /docker-entrypoint-initdb.c
          name: dump
   volumes:
     - emptyDir: {}
       name: dump
In the example above the InitContainer is used to download the dump.sql file which is then shared via the volume to the mysql container.
Static Pod: From K8s docs, static Pod are managed directly by the kubelet daemon on a specific node, without the API server observing them. The kubelet watches each static Pod and restarts it if it fails.
- a static Pod is defined at the /etc/kubernetes/manifest path on each node.
- are mainly used by k8s administrators to create system components.
- a change to a Static Pod using the edit command has no effect. Since kubelet monitors what is created in the static pods folder it is necessary to update the pod definition in the specific folder.
- a change to a static pod using the edit command has no effect.
- kubelet retrieves the definition of static pods from the /etc/kubernetes/manifest path, so you must edit the pod definition in that path for the change to take effect.
Example, create the static pod static-busybox that uses the busybox image and executes the "sleep 1000" command.
$ kubectl run --restart=Never --image=busybox static-busybox --dry-run=client -o yaml --command -- sleep 1000 > /etc/kubernetes/manifests/static-busybox.yaml

apiVersion: v1
kind: Pod
metadata:
  labels:
    run: static-busybox
  name: static-busybox
spec:
  initContainers:
    - name: static-busybox
      image: busybox
      command:
       - sleep
       - '1000'
      resources: {}
  dnsPolicy: ClusterFirst
  restartPolicy: Never
status: {}

Labels, Selectors and Annotations
In this blog section, we will explore Kubernetes Labels and Selectors, which are essential tools for organizing and managing resources within your Kubernetes cluster.
Labels in Kubernetes:
Labels are key-value pairs attached to Kubernetes objects, like Pods, to help identify and organize them based on user-defined attributes. Labels enable efficient querying and filtering of objects, making them ideal for use in user interfaces and command-line interfaces.
Selectors in Kubernetes:
Selectors are queries used to filter and retrieve Kubernetes objects based on their labels. They allow users to target specific resources that match the provided criteria, making it easy to manage and organize resources within a cluster.
Labels and Selectors use Cases:
Deployment and Pod Relationship Labels help define the relationship between Deployments and Pods. When a Deployment creates a Pod, it assigns the same set of labels to the Pod. This allows the Deployment to manage Pods with matching labels, ensuring the desired number of replicas is maintained. The relationship between a ReplicaSet and Pods is also defined using labels. The ReplicaSet uses a selector to identify and manage the Pods with matching labels, ensuring that the specified number of replicas is maintained.
Service and Pod Relationship Services in Kubernetes use labels and selectors to define their relationships with Pods. A Service uses a selector to identify the Pods it should target for load balancing and routing network traffic. This enables a Service to distribute requests among the matching Pods efficiently.
$ kubectl create deployment sample-deployment --image=example/my-application:1.0 --dry-run=client -o yaml

apiVersion: apps/v1
kind: Deployment
metadata:
  name: sample-deployment
  annotations: # <<< Annotation >>>
    author: "John Doe"
    description: "A sample deployment for demonstrating labels and selectors"
spec:
  replicas: 3
  selector:
    matchLabels: # <<< Selector >>>
      app: my-application
  template:
    metadata:
      labels: # <<< Labels >>>
        app: my-application
        version: "1.0"
        environment: "production"
      annotations:
        buildDate: "2022-01-01"
        contactEmail: "support@example.com"
    spec:
      containers:
      - name: my-container
        image: example/my-application:1.0
        ports:
        - containerPort: 8080
Kubernetes Annotations:
Annotations are key-value pairs that can be attached to Kubernetes objects to provide additional, non-identifying information, such as the version of an application or other human-readable metadata. Unlike labels, annotations are not used by Kubernetes itself, but rather serve as a way to store information for human users, tools, or libraries.

Config, Secrets and Resource Limits
Earlier you saw how PodSpecs can be used to define the container images that should be instantiated in the pods. Follow the best practice of portability: Make sure that your pods can run consistently without needing to change your container images for development or production. This can be done by separating your configuration data from your application code.
Config Map: To separate your configuration data from your application code in Kubernetes you can use a ConfigMap. A ConfigMap is an API object that stores data as key-value pairs. Other Kubernetes objects, such as pods, can then use the key values from the ConfigMap. The ConfigMap data can be used as environment variables, command line arguments, or as configuration files in a volume.
- to use a ConfigMap there are two steps, first you have to create the config map in key/value form and then you have to do injection of it into the Pod.
- you can use the whole content of the ConfigMap as Env, or you can import a single key and set is as environment variable, also you can mount the ConfigMap as Volume.
- when you mount the ConfigMap as a volume many files are created at mount path. The application can retrive the value from the file named using key.
Example, how to crear a ConfigMap
$ kubectl create configmap config-map-example --from-literal=foo=bar --from-literal=wow=baz --dry-run=client -o yaml

apiVersion: v1
kind: ConfigMap
data:
  foo: bar
  wow: baz
metadata:
  creationTimestamp: null
  name: config-map-example
Example, how to inject a ConfigMap into a Pod
apiVersion: v1
kind: Pod
metadata:
  name: hello
spec:
  containers:
   - name: hello
     image: busybox
# Option 1
# Import the whole key/value map as Env
     envFrom:
     - configMapRef:
         name: ConfigMapName
         key: foo
# Option 2
# Import the single value as Env
     env:
     - name: APP_BACKGROUND
       valueFrom:
        configMapKeyRef: ConfigMapName
# Option 3
# Crete foo and wow files in the mount path
# The foo file contains "bar" string
# The wow file contains "baz" string
     volumeMounts:
     - name: config-volume
       mountPath: /etc/config
  volumes:
    - name: config-volume
      configMap:
        name: ConfigMapName
Secrets: A ConfigMap is meant to store only nonconfidential data. All confidential data, such as AWS credentials, should be stored in Secrets. Secrets protect and encrypt confidential and sensitive information. Do not store confidential information directly in your pod definition or in your ConfigMap because that information is not secure and can be compromised.
Secrets store sensitive information in key-value pairs such as passwords.
- Note that the values for all keys in the data field of a secret must be base64-encoded strings.
- quando monti un secret come volume vengono creati dei file che contengono i dati, uno per ogni chiave.
- to make secrets really safe you must follow security best practices, by default secrets are only base64 encoded.
- with the declarative mode the secret value must be base64 encoded first:
echo "mysql" | base64
echo "bXlzcWwK" | base64 --decode - with the imperative mode the encoding is performed automatically.
Example, how to crear a Secret:
$ kubectl create secret generic db-secret --from-literal=DB_Host=sql01 --from-literal=DB_User=root --from-literal=DB_Password=password123 --dry-run=client -o yaml

apiVersion: v1
kind: Secret
data:
  DB_HOST: c3FsMDE=
  DB_Password: cGFzc3dvcmQxMjM=
  DB_User: cm9vdA==
metadata:
  creationTimestamp: null
  name: db-secret
Example, how to inject a Secret into a Pod
apiVersion: v1
kind: Pod
metadata:
  name: hello
spec:
  containers:
   - name: hello
     image: busybox
# Option 1
# Import the whole key/value map as Env
     envFrom:
     - secretRef:
         name: SecretName
# Option 2
# Import the single value as Env
     env:
     - name: DB_Password
       valueFrom:
        secretKeyRef:
          name: SecretName
          key: DB_Password
# Option 3
# Crete DB_HOST, DB_Password and DB_User files in the mount path
# The DB_HOST file contains "sql01" string
# The DB_Password file contains "password123" string
# The DB_User file contains "root" string
     volumeMounts:
     - name: secret-volume
       mountPath: /etc/secret
  volumes:
    - name: secret-volume
      secret:
        secretName: SecretName
Resource Requirements, Resource Limits
Requests and limits are the mechanisms Kubernetes uses to control resources such as CPU and memory. Requests and limits are on a per-container basis, each container in the Pod gets its own individual limit and request, but because it’s common to see Pods with multiple containers you need to add the limits and requests for each container together to get an aggregate value for the Pod.
To control what requests and limits a container can have, you can set quotas at the Container level and at the Namespace level. There are two types of resources: CPU and Memory.
A typical Pod spec for resources might look something like this. This pod has two containers:
apiVersion: v1
kind: Pod
metadata:
  name: resource-limits
spec:
  containers:
   - name: hello1
     image: busybox
     resources:
       requests:
         memory: '32Mi'
         cpu: '200m'
       limits:
         memory: '64Mi'
         cpu: '250m'
   - name: hello2
     image: busybox
     resources:
       requests:
         memory: '96Mi'
         cpu: '300m'
       limits:
         memory: '192Mi'
         cpu: '750m'
Each container in the Pod can set its own requests and limits, and these are all additive. So in the above example, the Pod has a total request of 500 mCPU and 128 MiB of memory, and a total limit of 1 CPU and 256MiB of memory.
- CPU resources are defined in millicores.
- Memory resources are defined in bytes.
- Default: 500m CPU and 256 Mi RAM.
If the node where a Pod is running has enough of a resource available, it's possible (and allowed) for a container to use more resource than its request for that resource specifies. However, a container is not allowed to use more than its resource limit.
ResourceQuotas
A resource quota provides constraints that limit aggregate resource consumption per namespace. A Quota for resources might look something like this:
apiVersion: v1
kind: ResourceQuota
metadata:
  name: quota
spec:
  hard:
   request.cpu: '500m'
   request.memory: '100Mib'
   limits.cpu: '700m'
   limits.cpu: '500Mib'
- requests.cpu As long as the total requested CPU in the Namespace is less than 500m, you can have 50 containers with 10m requests, five containers with 100m requests, or even one container with a 500m request.
- requests.memory As long as the total requested Memory in the Namespace is less than 100MiB, you can have 50 containers with 2MiB requests, five containers with 20MiB CPU requests, or even a single container with a 100MiB request.
- limits.cpu and limits.memory is the maximum combined CPU or Memory.
You can also create a LimitRange in your Namespace. Unlike a Quota, which looks at the Namespace as a whole, a LimitRange applies to an individual container. This can help prevent people from creating super tiny or super large containers inside the Namespace.

Pod Scheduling
This is one of the key components of Kubernetes master responsible for distributing the workload or containers across multiple nodes. The scheduler is responsible for workload utilization and allocating pod to a new node. It looks for newly created containers and assigns them to Nodes. Factors taken into account for scheduling decisions include individual and collective resource requirements, hardware/software/policy constraints, affinity and anti-affinity specifications, data locality, inter-workload interference, and deadlines.
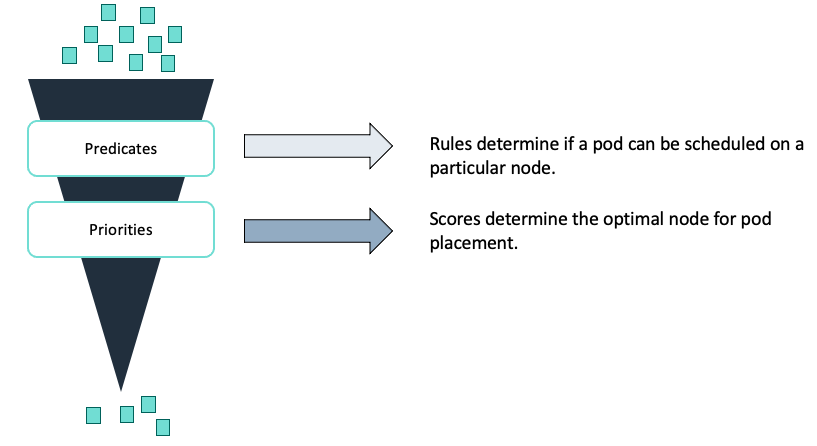
The scheduler uses filters to exclude ineligible nodes for pod placement and then determines the final node based on a scoring system. Predicates determine which nodes are ineligible. This can be due to volume, resource, or topology requirements. Priorities calculates a score for each node that has not been filtered out. Then, the scheduler places the pod on the highest-scoring node. If there are no available nodes remaining after all filters have been applied, scheduling fails.
Predicate: Volume requirements
The volume filter checks the pod’s volume requirements to determine which nodes are compatible. For storage backends that are topology-constrained and not globally accessible from all Nodes in the cluster you must know the Pod's requirements, otherwise this may result in unschedulable Pods. For example, an Amazon EBS volume in one Availability Zone cannot be attached to a node in a different Availability Zone. Similarly, a pod might require a specific volume that is already mounted on a node. In this case, you must place that pod on the same node.
Predicate: Resource requirements
The scheduler considers which nodes have the resources required by the pod. This includes things such as CPU, memory, disk space, and available ports. As you already know, resource requirements are defined at the container level, so the sum of resources requested for all containers defines the resources for the pod. The scheduler uses the number of resources when making a scheduling decision. Nodes cannot be overprovisioned, so if your cluster does not have enough resources for the pod, scheduling fails.
The limits parameter defines a finite limit on resources after the pod is running. A running container can burst resource usage from the original request up to the defined limit. If the container uses more resources than the limit allows, the scheduler terminates the container.
Predicate: Topology – Taints and tolerations
After satisfying volume and resource constraints, the scheduler considers constraints that have been set to fine-tune pod placement. You can set up scheduling constraints at the node level and at the pod level.
Taints and tolerations are settings that work together to control which pods can be placed on a particular node.
Taints are a property of nodes that prevent the placement of pods. A tainted node accepts only pods that specifically tolerate the taint. To taint a node, specify a key=value pair, such as skynet=false, and then add an action that defines when the taint is considered.
You can configure the scheduler to respect the taint during scheduling, in this case no pod will be scheduled on this node unless the pod has a matching toleration.
A toleration is a property of a pod that specifies that it can run on a tainted node. A toleration must match a specific taint.
You can apply a toleration to a specific pod that matches the taint that was set up earlier. The scheduler is now allowed to place this pod onto the tainted node, but it may also schedule it somewhere else based on other constraints.
- tolerations are used to specify which Pod can be scheduled on a certain node
- If a node has a taint=blue then only the Pod with tolerations=blue can be scheduled on the node
- you can specify the effect of a taint: NoSchedule, the Pod will not be scheduled on the node; PreferNoSchedule, the system tries not to schedule the Pod on the node but it is not guaranteed; NoExecute: new Pod will not be scheduled on the node, existing PODs on the node are terminated and moved elsewhere.
- to add a toleration to a Pod it is necessary to specify the property tolerations.
- it does not define a preference for a particular node, to deploy a Pod on a specific node you have to use Node Affinity.
Predicate: Topology – Node Selectors
Node Selectors are used to specify which node a Pod should be deployed on based on a label. To use Node Selectors, you need to specify the "nodeSelector" property in your Pod manifest file. This property should include the label key and value that you want to use for the Pod deployment. Once you have added the nodeSelector property to your manifest file, you can create the Pod as usual. Kubernetes will then deploy the Pod on a node that matches the label specified in the nodeSelector property.
Benefits of Using Node Selectors:
Node Selectors in Kubernetes provide benefits such as efficient resource utilization, improved performance, and simplified deployment. By specifying which node a Pod should be deployed on, resources are used more efficiently, resulting in better performance. Additionally, deploying a Pod on a node with the necessary resources can improve performance. Node Selectors also simplify deployment by allowing for easy Pod deployment based on specific labels.
Step-by-Step Guide to Implementing Node Selectors:
- Label the nodes: Use the "kubectl label" command to add labels to the nodes you want to use for your Pod deployment.
- Create a Pod manifest file: Create a manifest file for your Pod and specify the "nodeSelector" property with the label key and value that match the node you want to deploy on.
- Deploy the Pod: Use the "kubectl apply" command to deploy the Pod. Kubernetes will deploy the Pod on a node that matches the label specified in the nodeSelector property.
apiVersion: v1
kind: Pod
metadata:
  name: example-pod
spec:
  containers:
  - name: nginx
    image: nginx
    ports:
    - containerPort: 80
  nodeSelector:
    disk: ssd
In this example, the nodeSelector property specifies that the Pod should be deployed on a node with the label disk=ssd. Note that the label disk=ssd must already be applied to a node for this nodeSelector property to have any effect. You can apply the label to a node using the kubectl label nodes command, as mentioned in the content brief.
Predicate: Topology – Affinity
At times, you may need to make sure that a pod is scheduled on a specific node. Suppose the pod requires a specific hardware resource, such as a graphics processing unit (GPU) or solid state drive (SSD). To make sure that a pod runs on a specific node or instance type, you can use affinity settings. When combined with taints and tolerations, affinity settings make sure that only pods with a correct toleration can be scheduled to a node.
With a nodeAffinity setting, you can make sure that your pod only runs on some instance types. There are two types of node affinity:
- requiredDuringSchedulingIgnoredDuringExecution
- preferredDuringSchedulingIgnoredDuringExecution
You can think of them as “hard” and “soft,” respectively. The hard specifies rules that must be met for a pod to be scheduled onto a node. The soft specifies preferences that the scheduler will try to enforce but will not guarantee. The “IgnoredDuringExecution” part of the names means that if labels on a node change at runtime such that the affinity rules on a pod are no longer met, the pod continues to run on the node.
The "preferredDuringScheduling" means that the scheduler will try to run this set of pods on a specific node, however, if that’s not possible, the set is allowed to run elsewhere.
You can also specify affinity and anti-affinity at the pod level to control how pods should be placed relative to other pods. For example, with anti-affinity scheduling, you can make sure that your pods don’t end up on the same node. Do this to make sure the scheduler doesn’t create a single point of failure for a certain pod.
- Node Affinity and Node Selectors are almost the same, but Node Affinity allows you to specify more complex selection criteria.
- you can use "NotIn" to exclude some values or "Exists" to check if a specific key exists.
Node Affinity vs Taints & Tolerations
Node Affinity and Taints & Tolerations are two mechanisms in Kubernetes that help with scheduling Pods on specific nodes in a cluster.

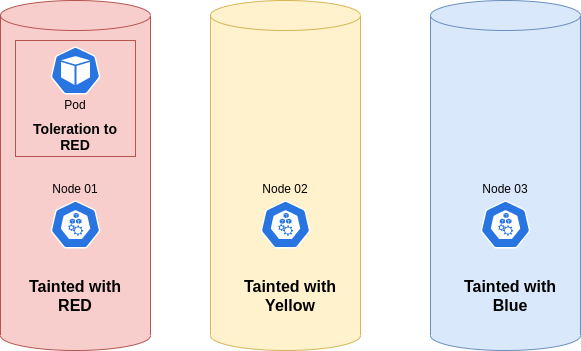
Let's say we have a Kubernetes cluster with two nodes, one labeled as "red" and the other as "blue". We want to ensure that Pods with a certain color label are only scheduled on nodes with a matching color label.
- Node Affinity would allow us to set a nodeSelector to match a specific color label, for example, "color=red". This would ensure that Pods with the "color=red" label are only scheduled on nodes with the label "color=red". However, it would not prevent Pods with a different color label, like "color=grey", from being scheduled on the same node.

- On the other hand, Taints & Tolerations would allow us to set a taint on nodes with a certain color label, for example, "color=red:NoSchedule". This would prevent any Pods with a matching toleration, like "tolerations: color=red", from being scheduled on the node with the "color=red" taint. This ensures that Pods with a different color label, like "color=blue", are not scheduled on the same node. However, it does not give us control over where the Pod is scheduled among the non-tainted nodes.

So, if you want to ensure that Pods with a certain color label are only scheduled on nodes with a matching color label you have to use a combination of Node Affinity, Taints & Tolerations. Node Affinity ensures that Pods with a specific label are only scheduled on nodes with a matching label, while Taints & Tolerations prevent Pods with a matching toleration from being scheduled on nodes with a certain taint.
If you are looking for a blogpost that delves further into this topic, I recommend this article by Waytoeasylearn.
Predicate: Topology – DaemonSet
A DaemonSet ensures that all nodes have a copy of the requested pod. This is useful when you want to provide common supporting functionality (such as security, logging, monitoring, or backups) for the pods running your application code. For example, if you need to collect logs from nodes, you can run a DaemonSet. Doing this ensures that a logging daemon pod, such as Fluentd, is run on all nodes. If you delete a DeamonSet, you also delete any pods it created across all the nodes.
You can run these daemons in other ways, such as with an init script instead of a DaemonSet. However, you can use DaemonSets to do the following:
- Monitor and manage logs for daemons like any other application.
- Maintain an ecosystem of similar Kubernetes toolsets and API clients.
- Isolate daemons from application containers.
Replace pods deleted because of unavoidable circumstances, such as node failure.

Probes for Containers
Distributed systems can be difficult to manage because they involve many moving parts, all of which must work for the system to function. Even if small part breaks, it needs to be detected, routed and fixed, and these actions need to be automated. Kubernetes allows us to do this with the help of probes, but before that we need to understand what is the lifecycle of a Pod.
These are the different phases:
- When the pod is first created, it starts with a pending phase. The scheduler tries to figure out where to put the pod. If the scheduler cannot find a node to place the pod on, it will remain pending.
- Once the pod is scheduled, it goes to the container creating phase, where the images needed by the application are pulled and the container starts.
- Next, it moves to the running phase, where it continues until the program is completed successfully or terminated.
Kubernetes gives you the following types of health checks:
- Readiness probes: This probe will tell you when your application is ready to serve traffic. Kubernetes makes sure the readiness probe passes before allowing the service to send traffic to the pod. If the readiness probe fails, Kubernetes will not send traffic to the pod until it passes. Kubernetes waits the probe before setting the container to the Ready state, this is very useful in the multi-container case, each could have different start times. What would happen if the application inside container on one of the PODs freezes? New users are impacted, the Pod is Ready even if it is not Alive.
readinessProbe:
   httpGet: ( tcpSocket | exec )
      path: /api/ready
      port: 8080
   initialDelaySeconds: 10 # Aspetta 10 secondi
   periodSeconds: 5 # Ricontrolla ogni 5 sec
   failureThreshold: 8 # Dopo 8 tentativi Fail
- Liveness probes: Liveness probes will let Kubernetes know if your application is healthy. If your application is healthy, Kubernetes will not interfere with the functioning of the pod, but if it is unhealthy, Kubernetes will destroy the pod and start a new pod to replace it. In the kube-controller-manager you can set the option --pod-eviction-timeout which defines how long to wait before replacing a Pod after a failure. The Pod is replaced only if it is part of a ReplicaSet or Deployment. What would happen if the application inside container on one of the Pods freezes? The probe allows to specify a condition to check if the application is still ready to receive traffic from users, so if you freeze the application the Pod would be restarted automatically.
livenessProbe:
  httpGet:
     path: /api/healthy
     port: 8080
     <opzioni-come-prima>
- Startup probes: Startup probes will let Kubernetes know when the container application starts. If such a probe is configured, it disables Liveness and Readiness checks until it succeeds. This can be used with slow-starting containers, preventing them from being killed before they are up and running.
startupProbe:
  httpGet:
    path: /healthz
    port: liveness-port
  failureThreshold: 30
  periodSeconds: 10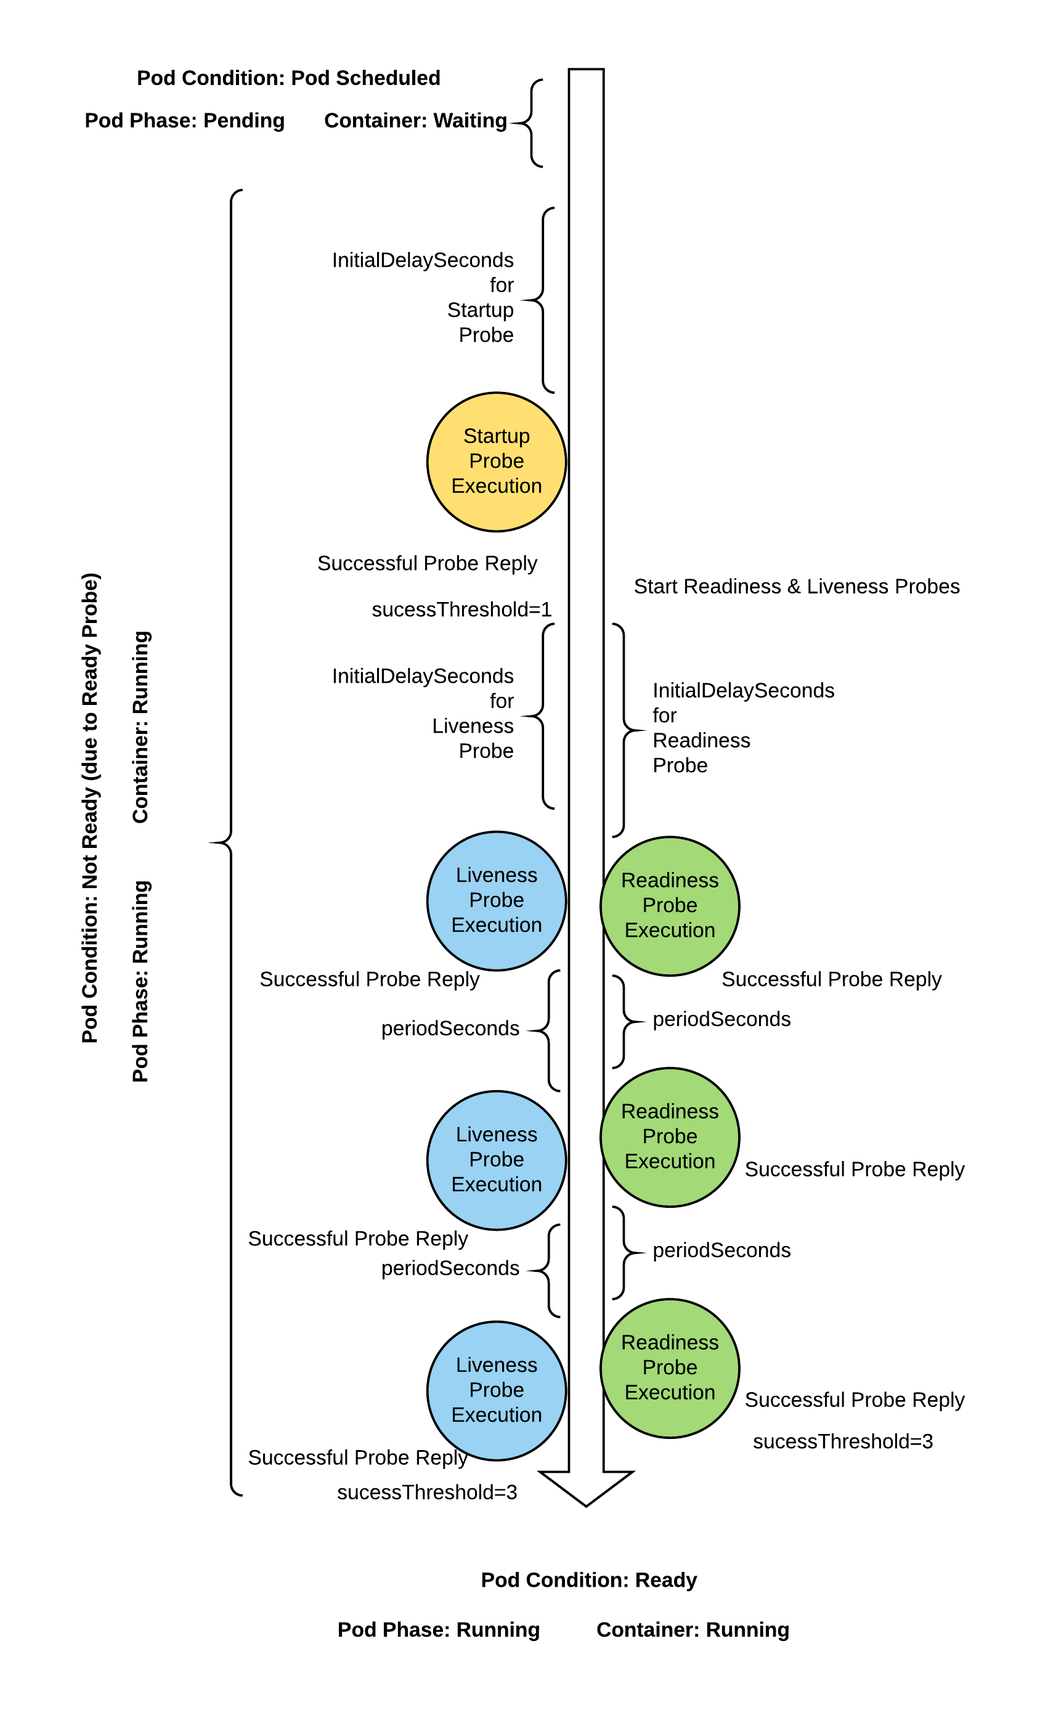

Logging & Monitoring
In any complex system, monitoring and logging are essential components for maintaining its health and ensuring its optimal performance. Kubernetes, being a complex container orchestration system, also requires robust monitoring and logging solutions to keep track of its components and applications running on it.
Monitor in Kubernets:
Monitoring Kubernetes involves tracking various performance metrics at both node and pod levels. Node level metrics include the number of nodes, number of healthy nodes, and performance metrics such as CPU, memory, network, and disk usage. Pod level metrics include the number of pods and performance metrics such as CPU and memory usage. Kubernetes offers various solutions for collecting and storing these metrics, including Metric server, Prometheus, Elastic Stack, Datadog, and Dynatrace. You can also use the kubectl top node and kubectl top pod commands to display node and pod-level metrics.
The kubectl top node command displays the current resource usage of each node in the cluster, including CPU and memory usage. The output shows the following columns:
- Node: The name of the node.
- CPU(cores): The total CPU usage across all cores on the node.
- CPU%: The percentage of CPU usage across all cores on the node.
- MEMORY(bytes): The total memory usage on the node.
- MEMORY%: The percentage of memory usage on the node.
The kubectl top pod command displays the current resource usage of each pod in the cluster, including CPU and memory usage. The output shows the following columns:
- NAME: The name of the pod.
- CPU(cores): The total CPU usage across all containers in the pod.
- MEMORY(bytes): The total memory usage across all containers in the pod.
If a pod has multiple containers, you can use the "-c" flag to specify the container name for which you want to see resource usage.
Logging in Kubernetes:
Logging, on the other hand, involves capturing and storing the application logs generated by the containers running on Kubernetes. Kubernetes offers a convenient way to view container logs using the kubectl logs command. The "-f" option allows you to tail the logs and see them in real-time. If there are multiple containers in a pod, you need to specify the container name in the command. If you want to view logs without using kubectl, you can use the docker logs <container-id> command and specify the container ID.
Having a robust monitoring and logging system in place for Kubernetes allows you to proactively monitor the health of your Kubernetes cluster. A well-designed solution can help you optimize resource utilization and make informed decisions about scaling your applications.

POD Design
Architectural patterns are ways to solve common problems. In a distributed solution, there is a set of common functions independent of business logic: logging, configuration, security, etc. Due to the need to implement these functions outside the business container and reuse them as necessary, patterns called sidecars, ambassadors or adapters are used.
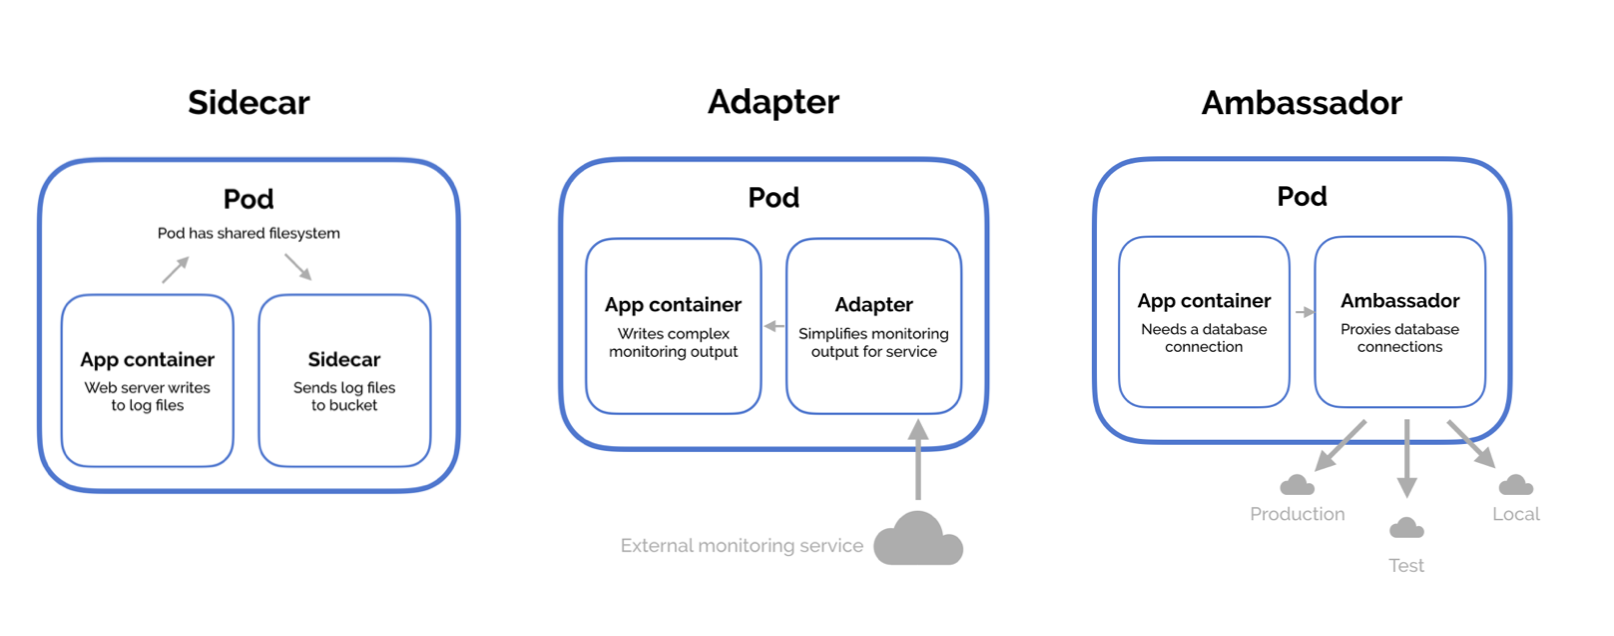
- Sidecar: As with motorcycles, the sidecar is placed next to the bike itself, the sidecar container is also positioned next to the legacy container, to extend its functionality. For example, you have a web service capable of responding to HTTP requests from clients and you want to evolve the solution by adding a security layer, thus implementing the HTTPS protocol. In this case you can use a sidecar container to implement the security layer and is independent of the business logic, can be reused where needed and encapsulate SSL certificates Management. You can use the same approach to extend service API or to collect logs from legacy container and push to monitor service, without having to change the code of the original container. This pattern is similar to the Decorator in object oriented programming.

- Ambassador: This pattern comes in handy when access to a service needs to be redirected according to a new policy. One of the most interesting applications of ambassador containers is for the Canary Deploy, let's imagine that you want to test a new version of a microservice, you can use an ambassador container to spins a desired percentage of traffic to the new container. This pattern is similar to the Proxy in object oriented programming.

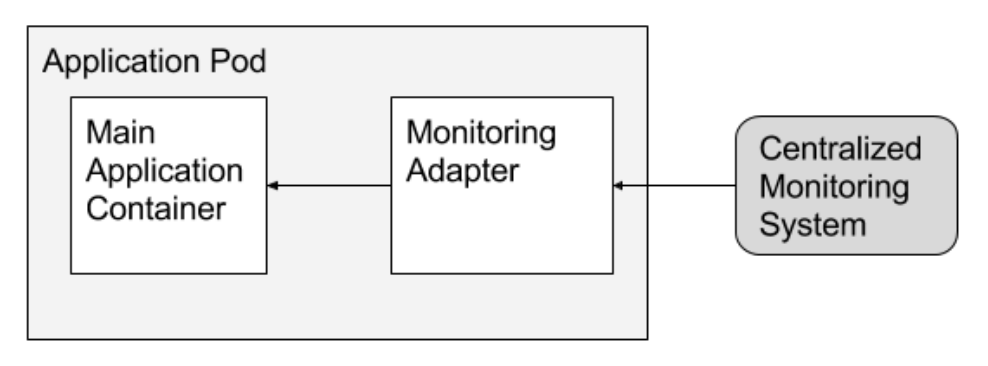
- Adapter: In this pattern, an adapter container offers standardized output and interfaces across multiple heterogeneous main application containers. In other words, you need to adopt an exposed interface of our legacy container so that it becomes usable by an external service on which we have no opportunity to intervene. In contrast to the ambassador pattern, which presents an application with a simplified view of the outside world, adapters present the outside world with a simplified, homogenized view of an application. An example of using adapter containers is the introduction of a legacy container monitoring layer, to collect metrics data and provide it to applications such as CloudWatch. This pattern is similar to the Adapter in object oriented programming.
Overall, these patterns provide ways to solve common problems in a distributed solution and can be used to implement common functions such as logging, configuration, and security. By implementing these functions outside the business container, they can be reused as necessary and encapsulate SSL certificates management, making the solution more scalable and flexible.

Services
Service is an abstraction level that Kubernetes uses to make a deployed application accessible from the internal and external of the cluster. While Pods are the basic entities, a Service acts as a layer above the pods and enable the communication between different pods in a cluster.

Consider the above example. Our application has groups of pods running, some pods are running in a Deployment, other two pods are running as single pod. Some pods have app:A label, while an other has the app:B label. The service selects all the pods with the app:A label. The service does not care if the pods are running in a Deployment or not.
You can create a web application, where you have pods serving front-end, other to serve back-end processes and finally a group for database. Each group has its own label, you can use services to enable connectivity between these group of pods and to decouple components. Also, services helps front-end apps to be made available to end users.
Types of services in Kubernetes
Kubernetes supports five different types of services:
- Cluster IP
- NodePort
- Load Balancer
- ExternalName
- Headless Services
Services can be exposed in different ways by specifying a type in the ServiceSpec.
ClusterIP service is the default Kubernetes service. Exposes the Service on an internal IP in the cluster. This type makes the Service only reachable from within the cluster. Therefore we use this type of service when we want to expose a service to other pods within the same cluster. Each node runs a kube-proxy container, which creates iptable rules on each host to redirect ClusterIP to the appropriate pods IPs. This type of service is useful for frontend pods to reach backend pods or to act as load balancers.
The YAML for a ClusterIP service looks like this:
apiVersion: v1
kind: Service
metadata:
  name: backend-clusterIP
spec:
  type: ClusterIP
  selector:
    app: backend
  ports:
  - name: http
    port: 80       # port of this service exposes within the cluster
    targetPort: 80 # port on the pod(s) to forward traffic to
    protocol: TCP
NodePort service is similar to a ClusterIP service except that it also opens a port on each node. It is the most easiest way to get the external traffic directly to your service. Opening the ports allows access to the service from inside the cluster (using the ClusterIP), while external parties can connect directly to the node on the NodePort. So, any traffic that comes to this port is forwarded to the service.
When a request is made from the internet, the request is sent to a single instance on a specific port. For each service, a randomly chosen port is opened on the local node, kube-proxy updates the iptables rules that forward traffic from the node port to the service's cluster IP and then to the pods.
The service in the below example listens on port 32001 and load balances the request to one of the WebApp pods, which then handles the request.
apiVersion: v1
kind: Service
metadata:
  name: FrontendService
spec:
  selector:
    app: webapp
  type: NodePort
  ports:
  - name: http
    port: 80         # port of this service exposes within the cluster
    targetPort: 80   # port on the pod(s) to forward traffic to
    nodePort: 32001  # port on the node where external traffic will come in on
    protocol: TCP
LoadBalancer service type extends the NodePort service by adding an external load balancer in the current cloud (if supported) and assigns a fixed, external IP to the Service. It is a superset of NodePort that creates a load balancer in front of all nodes.
The load balancer does not detect where the pods for a given service are running. Consequently, all worker nodes are added as backend instances in the load balancer. When a request is made from the internet, the request first arrives at the load balancer, then it forwards the request to one of the instances on a specific port. The load balancer routes the request to the nodes through an exposed port.
The FrontEnd service in this example is listening on RANDOM port and load balances this to one of the BackEnd pods, which handles the request. The external Load Balancer is listening on port 80.
apiVersion: v1
kind: Service
metadata:
  name: FrontendService
spec:
  selector:
    app: webapp
  type: LoadBalancer
  ports:
  - name: http
    port: 80           # port where external traffic will come in on
    targetPort: 9376   # port on which the service send requests to Pod
    # nodePort <Random: The service generates it>
ExternalName service type allow connection to a resource outside the cluster. Maps the Service to the contents of the externalName field (e.g. foo.bar.example.com), by returning a CNAME record with its value. For example, you can create a service called Database and point it to an external database endpoint. Pods that require access to the database connect to the database service, which returns the Amazon RDS endpoint.
This type of service is helpful if you decide to migrate the external resource to the Kubernetes cluster. Deploy the database in the cluster and update the service type to ClusterIP. The application can continue to use the same endpoint.
apiVersion: v1
kind: Service
metadata:
  name: Database
spec:
  type: ExternalName
  externalName: my.db.example.com
Headless Service is a service you can use when don't need load-balancing and a single Service IP. Usually, each connection to the service is forwarded to one randomly selected backing pod. If you perform a DNS lookup for a service, the DNS server returns a single IP, the service’s cluster IP.
Headless service instead allow the client to connect to all backing pods. If you tell Kubernetes you don’t need a cluster IP for your service, the DNS server will return the pod IPs instead of the single service IP. Instead of a single DNS A record, the DNS server will return multiple A records for the service, each pointing to the IP of an individual pod backing the service at that moment.
You can create what are termed "headless" Services, by explicitly specifying "None" for the cluster IP (.spec.clusterIP).
A typical use case for headless service is to interface with other service discovery mechanisms, without being tied to Kubernetes' implementation. The new service discovery mechanisms can therefore do a simple DNS A record lookup and get the IPs of all the pods that are part of the service, and then use that information to connect to one, many, or all of them.
The YAML for a Headless Service looks like this:
apiVersion: v1
kind: Service
metadata:
  name: backend-clusterIP
spec:
  clusterIP: None
  selector:
    app: backend
  ports:
  - name: http
    port: 80       # port of this service exposes within the cluster
    targetPort: 80 # port on the pod(s) to forward traffic to
    protocol: TCP
How to access to Services
When you create a service it is accessible in the same namespace using its name, for example: curl http://service-name . In the default namespace the full domain name is the following service-name.default.scv.cluster.local . Alternatively, if the service is created in a specific namespace then to access it from a different namespace you must also specify the name of the namespace in which the service was created, for example: curl http://service-name.namespace-name . As before, the full domain name is the following service-name.namespace-name.scv.cluster.local . Ultimately, the same service can be addressed using:
- service-name
- service-name.namespace-name.scv
- service-name.namespace-name.scv.cluster.local
where cluster.local is the root domain of the cluster. It cannot be broken down.
By default, Kubernetes does not assign a domain to Pods. This feature needs to be enabled manually by updating the configuration of CoreDNS, which is stored in /etc/coredns/Corefile. The configuration for CoreDNS can be found in the documentation.
In the configuration file, we can see the definition of:
- cluster.local: the root domain of the cluster
- pods insecure: to associate a name with the Pod 10-244-1-5.default... the conversion of the IP into the format with dashes is disabled by default.
Usually, the Corefile is passed to the POD as a ConfigMap object. The CoreDNS component takes care of adding the necessary information to its database every time a Pod or Service is created. The CoreDNS component also exposes a Kubernetes service, which is necessary for Pods to reach the component.
The DNS configuration is automatically done by the kubelet, which adds information about the nameserver to the file /etc/resolv.conf inside the Pod. Also, in the /etc/resolv.conf file, there is the search rule to address services without using the full name.
Further considerations about Services
Unlike Pod, which is scheduled on a specific node, when a service is created it becomes visible to all other Pods within the cluster. Services are objects that exist at the cluster level, in fact they don't exist at all, they are virtual objects: there is actually no server listening on IP:PORT of the service. A service is just a kube-proxy configuration. kube-proxy creates rules in several ways: userspace, ipvs, iptables: (Default). You can go deeper on this by using kubernetes doc. You can view the translation setting using the command iptables -L -t net | grep <search_term>.
The kube-proxy logs are in /var/log/kube-proxy.log on each node.
For Services to work, they need the network plugin. Without the network plugin, the service cannot address all the Pods.
Within the cluster, the range of IPs assigned to the Pods must be different from the range assigned to the Services. They must never overlap. You can get the reference range using the commands below:
For Services:
$ kubectl get pod kube-apiserver-kind-control-plane -n kube-system -o yaml
    spec:
      containers:
      - command:
        - kube-apiserver
        - [..]
        - --service-cluster-ip-range=10.96.0.0/16
        - [..]
For Pods:
$ kubectl get pod kube-controller-manager-kind-control-plane -n kube-system -o yaml
    spec:
      containers:
      - command:
        - kube-controller-manager
        - [..]
        - --cluster-cidr=10.244.0.0/16
        - [..]
In the case of overlapping, the Pod is not deployed since an IP cannot be assigned; however, you can run the Pod in None Network. Which network are the nodes in the cluster part of? Run the ip addr command and observe the IP address assigned to the ens3 interfaces. You can derive the network range from this.

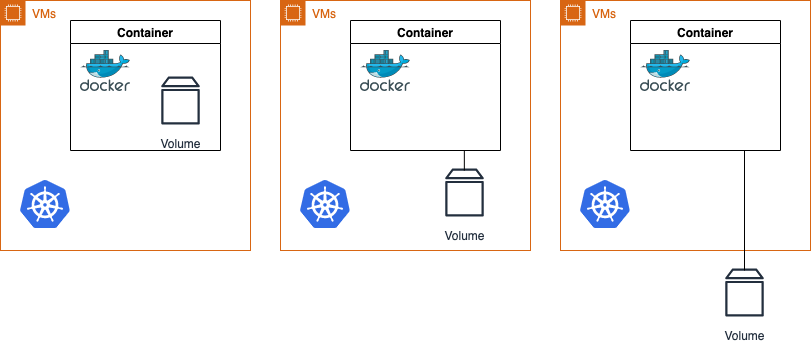
State Persistence & Storage
The biggest problem with managing persistent state is deciding where it should reside. There are three options available when deciding on where your persistent storage should live, and each has its own merits:
- Your persistent storage lives inside of the container. This can be useful if the data is replicable and non-critical, but you will lose data whenever a container restarts.
- Your persistent storage lives on the host node. This bypasses the ephemeral container problem, but you run into a similar problem since your host node is vulnerable to failure.
- Your persistent storage lives in a remote storage option. This removes the unreliability of storage on the container and host, but requires some careful thought and consideration into how you provision and manage remote storage.
Applications do require different level of persistence, as there are obviously varying levels of criticality for different applications. So before start you need to ask yourself how to design a stateful application, if your application require data to persist across both container and host restarts, you can use remote storage options.
Kubernetes provides a way for Pods to interact with remote (or local) storage options.
Here you can find:
- Volumes can be viewed as a directory that containers in a pod can access. The mounted storage that persists for the lifetime of the enclosing Pod.
- PersistentVolume (PV) is storage in your cluster that has already been provisioned and is independent of any individual pod.
- PersistentVolumeClaim (PVC) is a request for storage by a user.
- StorageClasses are used to describe different storage options.
In static approach, a cluster administrator creates a number of PVs. They carry the details of the real storage, which is available for use by cluster users. In dynamic approach, when none of the static PVs the administrator created match a user's PersistentVolumeClaim, the cluster may try to dynamically provision a volume specially for the PVC.
Pods can have access to shared volumes by (1) creating a PersistentVolumeClaim with a specific amount of storage requested and with certain access modes, (2) a control loop finds a match (if possible) with a PersistentVolume, (3) and binds them together. Finally, the Pod can mount the PVC as Volume.
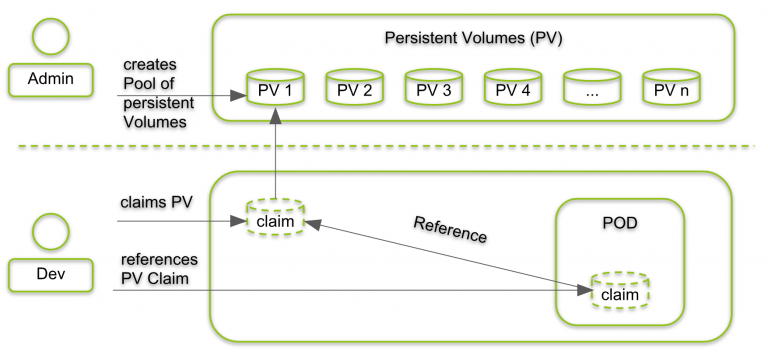
If cluster administrators want to offer varied PVs without exposing volume implementation details, they can use StorageClasses.
Kubernetes support many storage types, the CSI is a standard for exposing arbitrary block and file storage systems to containerized workloads. AWS provides CSI drivers for the different types of storage you can expose to Kubernetes. Using CSI, third-party storage AWS can write and deploy plugins exposing new storage systems in Kubernetes without ever having to touch the core Kubernetes code.
Kubernetes Volumes
When you start a docker container, the engine creates an additional layer to save changes. This layer will be deleted when the container terminates. Volumes will outlive any containers that spin up/down within that Pod, giving us a nice workaround to the ephemeral nature of containers.
Volumes can be used to persist changes, you can mount an existing folder or an empty one. This PodSpec example includes a Volume named redis-persistent-storage, which is mounted on the container.
apiVersion: v1
kind: Pod
metadata:
  name: pod-example
spec:
  containers:
  - name: ubuntu
    image: ubuntu:18.04
    command: ["echo"]
    args: ["Hello World"]
    volumeMounts:
    - name: redis-persistent-storage
      mountPath: /data/redis
  volumes:
  - name: redis-persistent-storage
    emptyDir: {}
[...]
As we can see from the Pod definition above, the .spec.volumes section specifies the name of the Volume and the ID of the type (an EmptyDir Volume in this case). To use this Volume, the container definition must specify the Volume to mount in the .spec.container.volumeMounts field.
Kubernetes provides many types of Volumes and a Pod can use any number of them simultaneously, here you can find a volume types list. Here is how to use a volume in Kubernetes to save Pod data in a specific path on the host:
apiVersion: v1
kind: Pod
metadata:
  name: test-pd
spec:
  containers:
  - image: k8s.gcr.io/test-webserver
    name: test-container
    volumeMounts:
    - mountPath: /opt
      name: data-volume
  volumes:
  - name: data-volume
      hostPath:
        path: /data
        type: Directory
While Volumes solve a huge problem for containerized applications, certain applications require the lifetime of the attached Volume to exceed the lifetime of a Pod. For this use case, Persistent Volumes and Persistent Volume Claims will be useful.
Kubernetes Persistent Volumes
You can save data in the node directory, but if Pod is restarted on another node, the data will still be lost. Persistent Volumes (PVs) are persistent storage available in the cluster and provided by the administrator. These PVs exist as cluster resources, just like nodes, and their lifecycle is independent of each individual Pod. A request for a persistent volume (PVC) is a user's request for storage (PV). Just as Pods consume node resources (e.g., memory and CPU), PVCs consume PV resources (e.g., storage).
The lifecycle of PVs is comprised of four stages: provisioning, binding, using, and reclaiming. The Persistent Volume definition specifies the capacity of the storage resource, as well as some other attributes, such as reclaim policies and access modes.
Below you will find a Persistent Volume definition.
apiVersion: v1
kind: PersistentVolume
metadata:
  name: persistent-volume
spec:
  capacity:
  storage: 8Gi
  accessModes:
    — ReadWriteOnce
  persistentVolumeReclaimPolicy: Recycle
  awsElasticBlockStore:
    volumeID: <volume-id> # This AWS EBS Volume must already exist.
Kubernetes Persistent Volume Claims
The user can consume PVs created by the administrator through PVCs. The Persistent Volume Claim definition defines the attributes that the persistent volume has to approve; some of these are storage capacity, access modes, storage class, etc. There is a one-to-one biding between PVCs and PVs. Labels and Selectors can be also used to specify a particular type of PV to query.
Kubernetes tries to optimize space, but if it cannot, it bind the PV to a larger PVC.
Below you will find a Persistent Volume Claims definition.
apiVersion: v1
kind: PersistentVolumeClaim
metadata:
  name: persistent-volume-claim
spec:
  accessModes:
    — ReadWriteOnce
  resources:
    requests:
      storage: 8Gi
Kubernetes Storage Classes
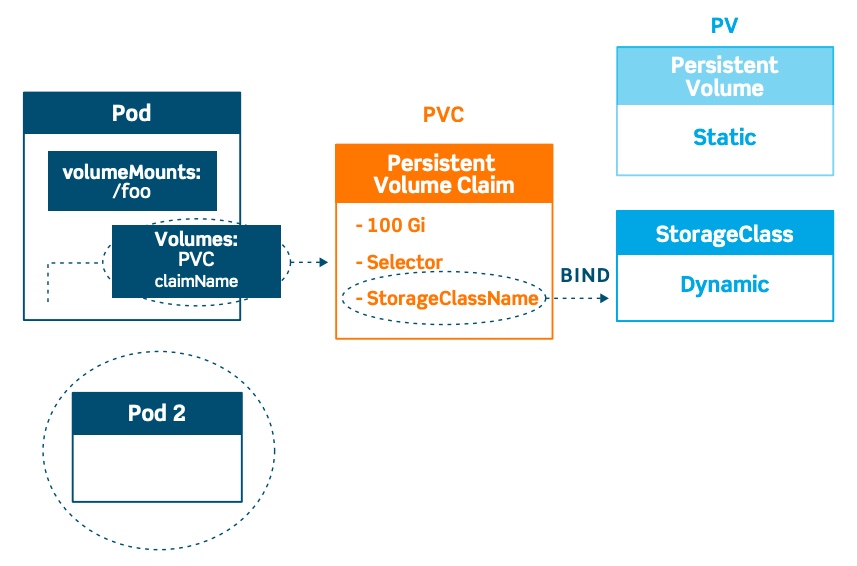
You can use Persistent Volume Claim to reference a manually created Persistent Volume or use StorageClass. Kubernetes storage classes provide a way to dynamically provision storage resources at the time of the request. Compared to the previous case where the Pod connected to the PVC by specifying a name, the PVC now connects to the StorageClass by specifying a StorageClassName.
Storage Classes allow for cluster administrators to describe the “classes” of storage that they offer and leverage these “classes” as a template when dynamically creating storage resources.
Below you will find a Storage Class definition.
apiVersion: v1
kind: StorageClass
metadata:
  name: storage-class
provisioner: kubernetes.io/aws-ebs
reclaimPolicy: Retain
parameters:
  type: io1
  iopsPerGB: 10
  fsType: ext4
Here you can see there are three main objects:
- Reclaim policies: only Retain or Delete are available..
- Provisioners: is in charge of deciding which volume plugin needs to be used when provisioning PVs.
- Parameters: are related with a particular provisioners and these parameters are used to describe the specifications for the particular “class” of storage.
Kubernetes Storage
Having now the definition of persistent volumes, persistent volume claims and storage classes, let try to put it all together. Volumes will outlive any containers that spin up/down within that Pod, giving us a nice workaround to the ephemeral nature of containers. Persistent Volumes and Persistent Volume Claims provide a way to abstract the details of how storage is provisioned from how it is consumed.
The lifecycle of PVs is comprised of four stages:
Provisioning: can be done in two ways: statically or dynamically. Static configuration requires the cluster administrator to manually create the number of PVs to be consumed. Dynamic provisioning can occur when the PVC requests a PV without any manual intervention by the cluster administrator, and requires storage classes.
Binding: When it’s created, a PVC has a specific amount of storage and certain access modes associated with it. When a matching PV is available, it will be exclusively bound to the requesting PVC for however long that PVC requires. If a matching PV does not exist, the PVC will remain unbound indefinitely. In the case of dynamically provisioned PVs, the control loop will always bind the PV to the requesting PVC. Otherwise, the PVC will get at least what they asked for in terms of storage, but the volume may be in excess of what was requested.
Using — Once the PVC has claimed the PV, it will be available for use in the enclosing Pod as a mounted Volume. Users can specify a specific mode for the attached Volume (e.g. ReadWriteOnce, ReadOnlymany, etc.) as well as other mounted storage options. The mounted PV will be available to the user for as long as they need it.
Reclaiming — Once a user is done utilizing the storage, they need to decide what to do with the PV that is being released. There are three options when deciding on a reclamations policy: retain, delete, and recycle.
- Retaining a PV will simply release the PV without modifying or deleting any of the contained data, and allow the same PVC to manually reclaim this PV at a later time.
- Deleting a PV will completely remove the PV as well as deleting the underlying storage resource.
- Recycling a PV will scrub the data from the storage resource and make the PV available for any other PVC to claim.
You can delete the PVC, this will not delete the PV. The default behavior of the PV is retain; it cannot be used by other PVCs.
- persistentVolumeReclaimPolicy: Retain
- persistentVolumeReclaimPolicy: Delete
- persistentVolumeReclaimPolicy: Recycle
PersistentVolumes, the default reclaim policy is Delete. This means that a dynamically provisioned volume is automatically deleted when a user deletes the corresponding PersistentVolumeClaim. If Recycle, the data in the PV are erased, so the Volume can be used by other PVCs.
You can use the previous Storage Class within a Persistent Volume Claim
apiVersion: v1
kind: PersistentVolumeClaim
metadata:
  name: storage-class-pvc
spec:
  storageClassName: storage-class
  accessModes:
    — ReadWriteOnce
  resources:
    requests:
      storage: 8Gi
An example Pod definition that leverages Persistent Volume Claims for requesting storage can be seen below:
apiVersion: v1
kind: Pod
metadata:
  name: test-pod
spec:
  containers:
    — name: test-container
      image: nginx
      volumeMounts:
        — mountPath: /data
          name: pvc-volume
  volumes:
    — name: pvc-volume
      persistentVolumeClaim:
      claimName: persistent-volume-claim
When comparing this Pod definition with the earlier one utilizing Volumes, we can see that they are nearly identical. Instead of directly interacting with the storage resource, the Persistent Volume Claim is used to abstract away storage details from the Pod.
If we compare the PVC definition to the one above used in the statically provisioned use case, we’ll see that they are identical. This is due to the clear separation between storage provisioning and storage consumption. When comparing the consumption of Persistent Volumes when created with a Storage class versus when created statically, we see some huge advantages. One of the biggest advantages is the ability to manipulate storage resource values that are only available at resource creation time. This means that we can provision exactly the amount of storage that the user requests without any manual intervention from the cluster administrator. Since Storage Classes need to be defined ahead of time by cluster administrators, they still maintain control over which types of storage are available to their end-users while also abstracting away all provisioning logic.
If you are looking for a blogpost that delves further into this topic, I recommend Conquering Statefulness on Kubernetes by Nick Groszewski.

Conclusions
In the first part, we covered the fundamental concepts of Kubernetes architecture and basic notions such as labels, selectors, annotations, config maps, secrets, resource limits, pod scheduling, probes, logging, monitoring, pod design, services, and state persistence. In the upcoming second part, we will delve deeper into networking, security, user permissions and management, designing and installing K8s clusters, cluster maintenance, troubleshooting, and other advanced topics such as custom schedulers and using multiple schedulers. We will also explore how Amazon EKS integrates Fargate and Kubernetes schedulers. Stay tuned for more exciting insights into Kubernetes!
Comments